This assignment is due by 10/27/2025 11:59pm.
You've kept the items stashed away in your travel sack, waiting for what will come next. The cloaked figure again approaches you.
It is time. We must make our way to meet the others. They have already gathered and require your ingredients to complete the transformation.
Others? Transformation?
With all your gear in hand, you make your way to the edge of town and begin heading towards the volcano. Perhaps all the people you saw traveling this direction when you arrived are the others?
Part I - Give Your Hero Life
As you exit the gate, the cloaked figure emerges from seemingly nowhere. You're handed a map. On the map is marked the town and the volcano. The marked path, which you assume is for you to follow, doesn't head to the volcano. It winds its way through the mountains to the forest.
Find him here. Say aloud the incantation and he will reveal himself to you.
You flip over the map and see the spell. You commit it to memory:
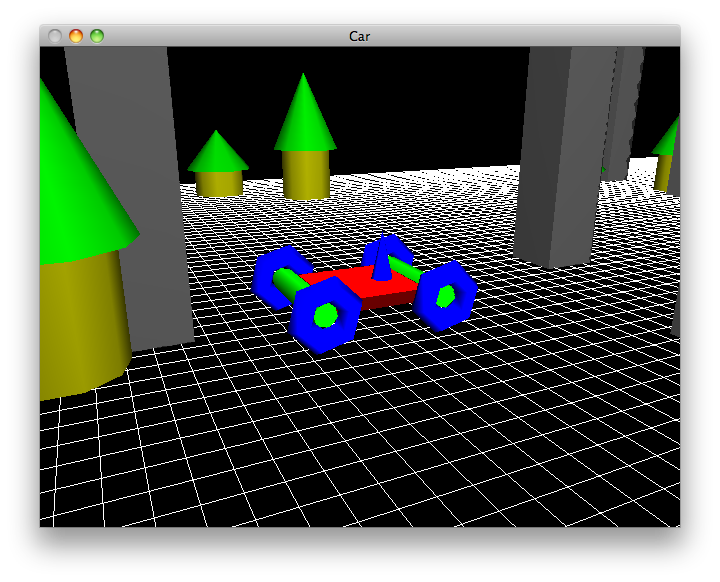
For this assignment, you are to create an OpenGL/GLFW program that contains either your Hero or a vehicle to transport your Hero drawn in 3D. Be sure to use the pieces from the previous labs as the basis of your program. The user will be able to move the 3D character forward and change its heading, as well as control a camera which rotates around the character. The character itself can be constructed from CSCI441 3D Objects or custom VAO/VBO objects in a hierarchical fashion, like the previous assignment. The character must have some level of animation when moving and/or stopped. Your character must have a clear front and back which are aligned with its current heading.

Out for a Sunday drive through the city/park.
In order to be able to render your 3D Hero, you will need to create a shader program comprised of a vertex and fragment shader. You must implement the full Phong Illumination Model (diffuse + specular + ambient) Gouraud Shading expanded from Lab05. It is fine to use a directional light for this assignment, but a point light may be used instead if you'd like.
FFP-Free: Feel free to try your own unique and custom effect and deviate from the shading models we have looked at so far.
Whatever your shading implementation, we must be able to differentiate objects from one another using different materials.
Pressing 'w' will move the character
forward along the heading and pressing 's' will move the character backwards along the heading. Pressing 'a' or 'd'
will turn the character's heading left or right respectively. The user must be able to control an arcball camera with the
mouse that is centered around the character (looking at the character's current X, Y, Z). In other words, the user can
change theta and phi to rotate the camera around the character as the character moves and the character will stay in the center of the
screen. The camera and the character will be able to rotate independently.
Additionally, there must be some other objects in the scene so that we can see the character moving. You can now bring your world to life! At a minimum, this should include a grid of line strips and additionally can be as sophisticated as a city or forest. Your character cannot be able to move off the grid. Bounds checking will need to be performed to keep the character in its world. You do not need to worry about checking if your character has collided with one of the scene objects (such as a building or tree). For an added challenge though, feel free to add some simple collision detection to prevent your character from running through every object.
Be creative! Your character can be a 3D humanoid representation of your Hero or a vehicle to transport your Hero.
The vehicle does not need to be a car, but any type of transportation device (wagon, helicopter, plane, scooter, rocket ship, etc).
It would be a wise idea to have a function drawCharacter() that does all of the hierarchical drawing for your character. You
will be using this character again in future assignments.
This next section is for the extra credit achievement: Doom iddt
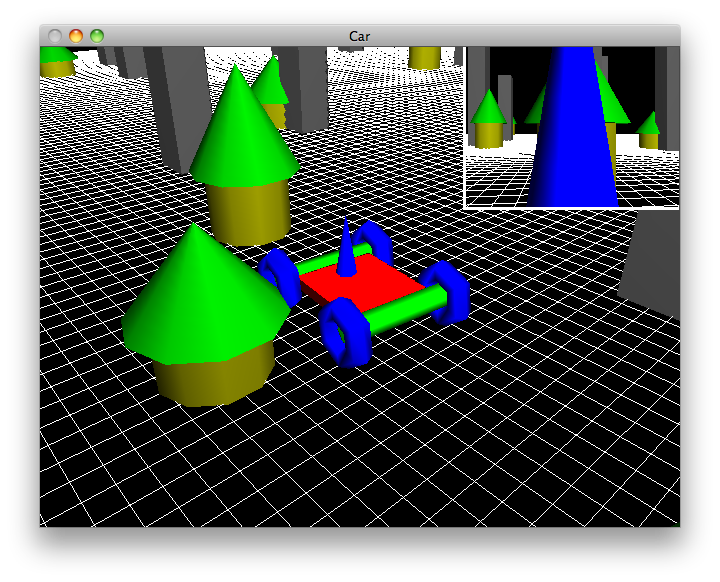
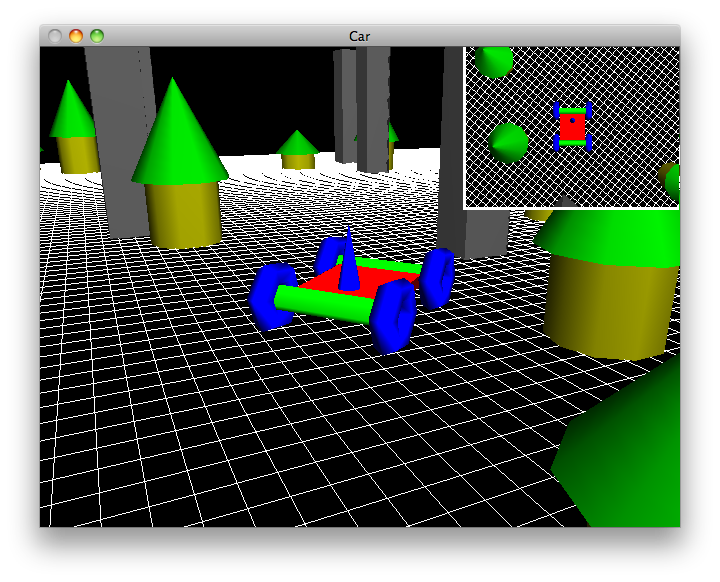
Using viewports, render additional camera views, and overlay them on top of the normal 3D view. Your viewport may occupy any portion of the space on the screen; you could make the viewport split-screen style or have it occupy a corner of the screen like a mini-map. In order to receive full credit, you MUST have multiple objects making up a scene (i.e., boxes of different size as a city, cones stacked on top of cylinders for trees, etc.). In other words, the scene must be more complicated than just a grid for the ground.

Watch out for that tree!
If you want to implement additional camera models beyond the arcball camera, here is a list of camera models you can choose from:
- First-Person Cam: The view looking from the point-of-view of the character along its heading.
- Sky Cam: A camera positioned directly overhead the character and looking straight down. The camera must follow the character and turn with the character so that the character is always pointing forward (towards the top of your window).
- Third-Person Cam: A camera that is located just behind the character and looking along the character's heading. The camera must follow the character and stay a fixed distance behind the character. (Think Mario Kart)
- Reverse Cam: Similar to the third-person cam, but instead is positioned in front of the character and looking backwards along the character's heading.
- First-Person Movable Cam: Position as described by the first-person camera, but the user can control the direction of view to mimic the character looking around the world.
The user should be able to toggle between any available cameras by pressing the 1-9 number keys.

Today's aerial coverage brought to you by Goodyear!
Ready for the journey ahead, you set off.
Part II - Website
Update the webpage that you submitted with A2 to include an entry for this assignment. As usual, include a screenshot (or two) and a brief description of the program, intended to showcase what your program does to people who are not familiar with the assignment.
Documentation
With this and all future assignments, you are expected to appropriately document your code. This includes writing comments in your source code - remember that your comments should explain what a piece of code is supposed to do and why; don't just re-write what the code says in plain English. Comments serve the dual purpose of explaining your code to someone unfamiliar with it and assisting in debugging. If you know what a piece of code is supposed to be doing, you can figure out where it's going awry more easily.
Proper documentation also means including a README.txt file with your submission. In your
submission folder, always include a file called README.txt that lists:
- Your Name / email
- Assignment Number / Project Title
- A brief, high level description of what the program is / does
- A usage section, explaining how to run the program, which keys perform which actions, etc.
- Instructions on compiling your code
- Notes about bugs, implementation details, etc. if necessary
- How long did this assignment take you?
- How much did the lab help you for this assignment? 1-10 (1 - did not help at all, 10 - this was exactly the same as the lab)
- How fun was this assignment? 1-10 (1 - discontinue this assignment, 10 - I wish I had more time to make it even better)
Grading Rubric
Your submission will be graded according to the following rubric:
| Percentage | Requirement Description |
| 10% | Character must be constructed in a hierarchical fashion using different colors for different parts. Some portion of the character is animated (arms & legs swinging, wheels spinning, turret rotating, etc.). |
| 5% | User must be able to move the character forward and backwards along its heading with the keyboard. Character stays on the grid and cannot move beyond its boundaries. |
| 10% | User must be able to change the character's heading with the keyboard. Character must rotate appropriately with heading change. |
| 5% | There must be some "scene" surrounding the character to provide a sense of motion when the character moves. This minimally includes a grid and possibly a collection of decorative objects. |
| 20% | Vertex & Fragment Shader correctly implemented. Shader Program correctly implemented with necessary inputs linked. |
| 15% | Phong Illumination Model using Gouraud Shading correctly implemented. |
| 10% | The camera must follow an arcball camera model, have the character as its look-at point, and must move with the character. |
| 10% | The user must be able to correctly control the angles of the camera with the mouse by holding the left mouse button and dragging. |
| 10% | The user must be able to correctly zoom in and out by holding Shift + left mouse button and dragging. |
| 5% | Submission includes source code, and README.txt.Source code is well documented. Webpage named <HeroName>.html submitted and updated with screenshot from latest assignment. Submission compiles and executes in the lab machine environment. |
To earn the extra credit achievement, the following criteria must be met. Late submissions are ineligible to earn the extra credit achievement.
| Extra Credit Requirement Description |
| The user must be able to render the scene from a secondary virtual camera in addition to the main world camera. |
| The viewport is drawn correctly for the secondary display. |
| The viewport for the original display is not adversely affected by the secondary display's viewport (i.e. viewport is reset properly, there are no related bugs). |
| The secondary view must be a camera attached to the vehicle, whose orientation is fixed to the vehicle. |
| The scene must be more complicated than a single ground plane; it must include multiple objects scattered around to give a sense of motion as the vehicle navigates. |
Experience Gained & Available Achievements

Assignments +125 XP
|

Web +125 XP
|

FFP-Free
|

Doom iddt
|
 ???
|
 ???
|
 ???
|
Submission
When you are completed with the assignment, zip
together your source code, CMakeLists.txt, and
README.txt
into a folder named src/ plus include your www/ folder. Name the zip
file,
HeroName_A3.zip
. Upload this file to Canvas under A3. The structure of your submission
should look as follows:
HeroName_A3.zipsrc/README.txtCMakeLists.txtA3Engine.cppA3Engine.hmain.cpp- all_additional_code
www/images/- all_images
HeroName.html- all_additional_files
This assignment is due by 10/27/2025 11:59pm.