This lab is due by Thursday, May 05, 2022, 11:59 PM.
As with all labs you may, and are encouraged, to pair program a solution to this lab. If you choose to pair program a solution, be sure that you individually understand how to generate the correct solution.
Instructions
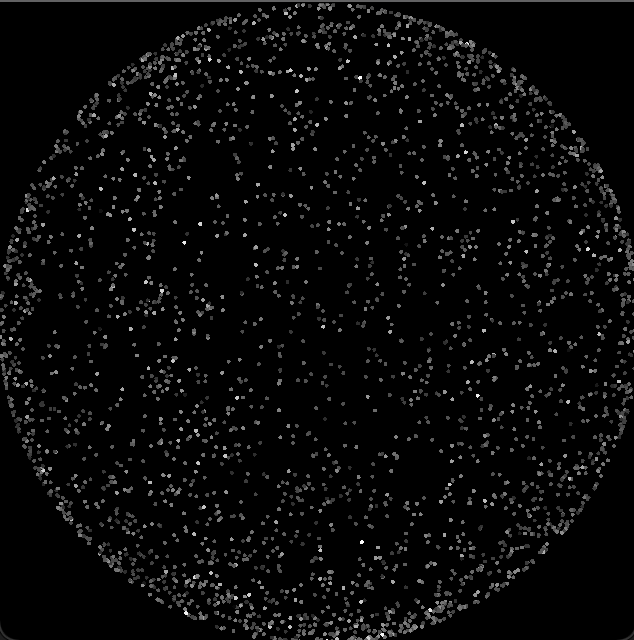
Your task for this lab is to read in a star data file, store the data in a list of objects, make modifications to the data, and then draw a star map similar to the one shown here:
We'll begin by describing the data to store. Then the following sections will describe how to store and modify the data. The final sections will describe how to display the data.
Data File
To begin, download the stars.txt file and place in your project folder.
Each line of the data file contains information of one star, with each field separated by a tab. The meaning of each field (column) is described below. Note that data files often contain more information than is needed for a given purpose and that data files may contain outlying values that are also not needed for a given purpose. We suggest you take a look at the stars.txt file as you read the following details about your input file.
- The first three fields are the
x,y, andzcoordinates for the star. You will need to read & store thexandycoordinates, but will not need to store thezcoordinate. - The fourth field is the
brightnessof each star. - The fifth and sixth fields are the Henry Draper and Harvard Revised numbers for the star. These are numbers used in different star catalog systems, so they do not need to be stored for this task.
Star Class
We now need to create a class to store the data that represents a single star. Create a Star class that extends
the SFML CircleShape using public inheritance. Our class must have the following members:
- A private integer data member to store the window width
- A private integer data member to store the window height
- A private float data member to store the max brightness value
- A parameterized constructor that sets each data member accordingly
- A public method called
setPositionthat accepts to two floats corresponding to the (x, y) coordinate of the center of star - A public method called
setBrightnessthat accepts a single float
Constructor
The constructor needs to accomplish four steps:
- Assign each data member to its corresponding parameter.
- Since
Staris-aCircleShape, we'll set the radius of our star to be2.0. - Since
Staris-aCircleShape, we'll set the position of our star to be(0.0f ,0.0f). - We'll call through to our
setBrightness()passing it as an argument half of the max brightness value.
setPosition()
We will need to manipulate the star data to have it
in a form that will work with our program and ultimately be able to plot them visually. The first manipulation we do will relates to the (x, y)
coordinate the star exists at.
Each axis in the star coordinate system goes from -1.0 to +1.0 and the
origin (0, 0) is at the center. Thus, the x and y coordinate values for each star
will all be numbers in the range -1.0 to +1.0.
The coordinate system used in our graphics library (SFML)
has the origin (0, 0) in the upper-left corner
of the picture, and the maximum x and y values are the
width and height of the window, in pixels.

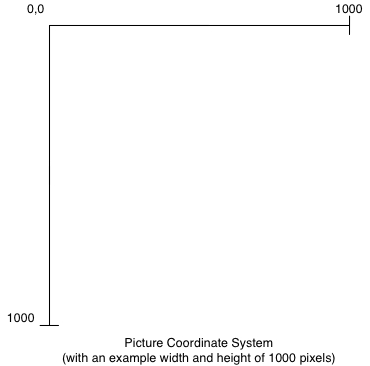
Thus, to determine the location of each star to draw in our graphics library,
you need to convert from the -1.0 to +1.0 range of the star
coordinate system to the (0, 0) to (WIN_WIDTH, WIN_HEIGHT)
range of the graphics library coordinate system.
More specifically, if xStar is a float variable holding a star's x-coordinate
in the range -1.0 to +1.0, to convert it to a pixel value in the
range 0 to WIN_WIDTH, you would use the following:
xPixel = ( xStar + 1.0 ) * WIN_WIDTH / 2.0;Similarly, if yStar is a float variable holding a star's y-coordinate in the
range -1.0 to +1.0, to convert it to a pixel value in the range 0
to WIN_HEIGHT, you would use the following:
yPixel = ( -yStar + 1.0 ) * WIN_HEIGHT / 2.0;Note the minus sign on the yPixel equation. We encourage you to plug a few coordinates into these equations, e.g., (-0.5,0.5) and (-0.5,-0.5), to ensure the equations are correct.
Once we have the transformed xPixel and yPixel values, we can call the CircleShape's setPosition
method to set the position.
To verify the modifications are correct, the first line of the stars.txt file is:
0.994772 -0.023164 -0.099456 4.610000 28 3If our window is sized 640x640, then the first star would be transformed to (638.327, 327.412).
setBrightness()
One of the most common ways to represent colors is with the RGB color model. In this model, each color is represented with three numbers in the range 0 to 255 that represent the amount of red, green, and blue to include in the color. For example, (255,0,0) is the color red and (255,255,0) is the color yellow (i.e., red and green combined). Any color with the same amount of red, green, and blue is a shade of gray. We will use shades of gray to draw our stars with different brightness; thus, in this project, you should include the same amount of red, green, and blue in your colors drawn.
SFML has a Color class that allows the drawing of specific colors using the RGB model. For example, each of the following examples sets the fill color of a starShape to a different shade of gray:
// Black
starShape.setFillColor(Color(0, 0, 0));
// Dark gray
starShape.setFillColor(Color(64, 64, 64));
// Medium gray
starShape.setFillColor(Color(128, 128, 128));
// Light gray
starShape.setFillColor(Color(192, 192, 192));
// White
starShape.setFillColor(Color(255, 255, 255));
To determine the shade of gray for each star drawn in this project, you need to scale the brightness value of the star to an integer value between 0 and 255 and set the fill color using that value, as shown above. For example, if brightness is a double variable holding a star's brightness value in the range 0.0 to BRIGHTEST_STAR, to convert it to an integer value in the range 0 to 255, you would use the following:
int shadeOfGray = (int)( ( 255.0 * brightness ) / BRIGHTEST_STAR );You would then use this shadeOfGray variable to set the drawing color and fill color:
setFillColor( Color(shadeOfGray, shadeOfGray, shadeOfGray) );Adding in the grayscale for each star would result in the following dimmed image:
This is completing the task, however we are interpreting the brightness values incorrectly. In the
star system format, 0.0 represents what should be the brightest star and a larger value signifies the darker
a star should appear. Therefore, when calculating the shadeOfGray value, we need to "invert" the value of the brightness
before performing the grayscale calculation:
invertedBrightness = BRIGHTEST_STAR - brightness;Now when plotting the stars, the edge is dimmer and the brightest star is at the center of the map:
Reading the Stars
We now can read and parse the data file. While doing so, we will want to create a star object for each record and set it's (x, y) position & brightness.
We will then store each object in a list of stars. However, we only want to create and store stars that have a brightness within the inclusive range of 0.0 to 8.0.
At this point your program should open, read, and store the valid stars into a list of Star objects. The given star file has 3,521 valid stars to check your progress thus far.
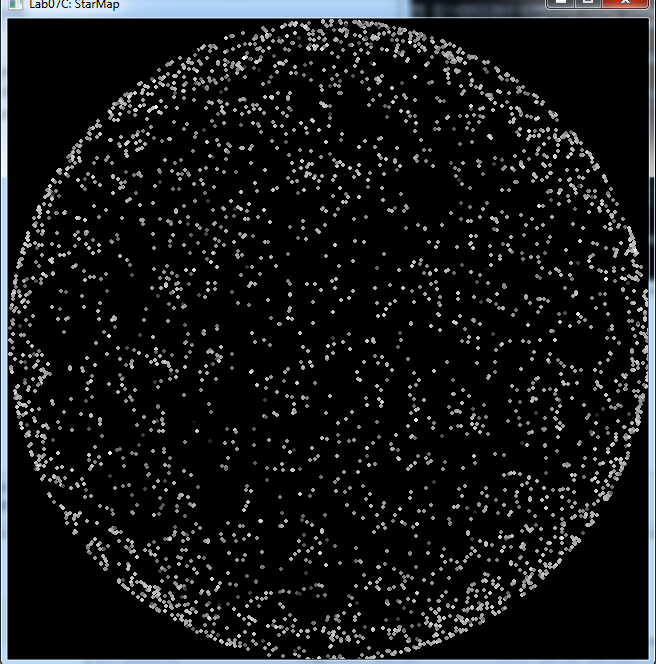
Drawing a Star
In your code, you'll need to draw each star. Since stars are CircleShapes we can draw them just as we do a circle:
window.draw(star);We should now be able to successfully run our program and see a visualization of the stars, as seen below.
Lab Submission
Submit your main.cpp, Star.h, Star.cpp file(s).
You will submit your solution to this lab with the rest of Set7. Detailed instructions for doing this are posted in Assignment 7.
This lab is due by Thursday, May 05, 2022, 11:59 PM.
As with all labs you may, and are encouraged, to pair program a solution to this lab. If you choose to pair program a solution, be sure that you individually understand how to generate the correct solution.