CSCI 261 - Programming Concepts (C++)Spring 2017 - Lab 01AQuick Links: Blackboard | Canvas | CS @ Mines | Cloud9 | Piazza | zyBooks |
|
| | Home | Contact | Syllabus | Assignments | Schedule | Resources | | |
|
This lab is due by
January 17, 2017 11:59PM.
Solutions and ProjectsThis lab teaches you how to create a
C++ Visual Studio project from scratch. Visual Studio is an Integrated
Development Environment (IDE) designated to facilitate the development
of software solutions. Visual Studio includes an editor, a compiler, a
linker, a debugger, and many other additional tools to help programmers
write high quality software.
Depending on its complexity, a software project will have many
different files associated with it, such as the source code
(instructions written using a programming language), header files
(mostly definitions), resource files (images, sounds), data files, and
configuration files. Most IDEs, including Visual Studio, require
programmers to organize all of these files into an entity called project.
More complex software may be built from many inter-related projects
that are organized in a solution (a container for
projects). But, in our course this semester, we will only develop single-project
solutions.
Creating a C++ Empty Project
Before you begin, create a destination folder for all your C++ projects
(if you haven't already done so) on the computer you'll mainly use to
work this semester. We recommend a folder name called CSCI261, but you
can use whatever you want; just make sure you have write permission and
free space in your chosen location. If you think that you'll mainly
work on campus in one of the Mines' labs, we suggest you create your
project's folder on the network drive (i.e., Z:\CSCI261). This link
provides instructions on how to map the network drive on your own
laptop to your Mines folder, if you want to store on the Z drive but
work on your home computer. Alternatively, you can also work using a
USB flash drive or SD card; this option, however, will slow down the
compilation process.
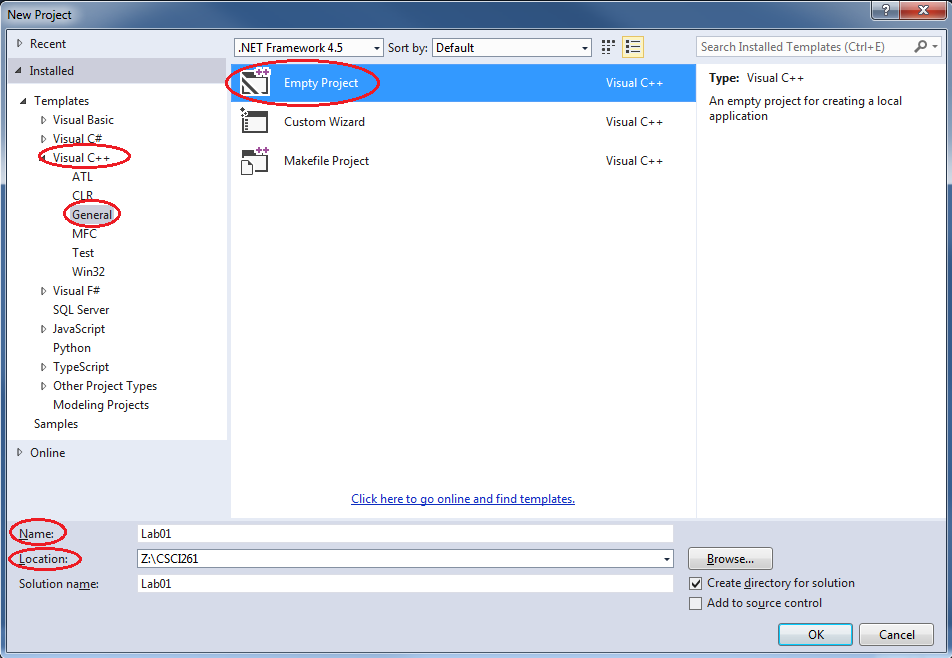
Now that you have set your project's folder you may proceed to create
your first C++ Visual Studio project. How exciting! Open Visual Studio
if you haven't already, take a deep breath, and select the menu option
FILE - New Project (or type Ctrl+Shift+N). The ''New Project'' wizard
window should open. From the left side menu, select Installed -
Templates - Visual C++. At the center of the window, select the ''Empty
Project'' template. At the bottom of the window, type in your project's
name (e.g., Lab01A), location (e.g., Z:\CSCI261), and solution name
(e.g., Lab01A). Note: before hitting ok, read the next paragraph.
Let us now provide you with a few
important notes about names for projects, solutions, and development
files in general. Avoid using spaces or any special characters when
naming your project. We highly recommend using short names (less than
10 characters). If you want to use more than one word, use underscore
to connect the words or appropriate use of upper/lower case (e.g.,
MyGame). Also, make sure your chosen name has a meaning so you can
remember what the project is later (e.g., Lab01A). As you type in the
name of your project, Visual Studio will automatically replicate the
project's name as your solution's name and that's fine. Finally, don't
forget to map your project's location appropriately. See the example
below, and then hit OK.
Likely Errors: If you receive an error of "The Project
location is not fully trusted by the CLR runtime.", hit OK. If you
receive an error of "The 'VSPackage' package did not load correctly.",
hit NO. We are sorry for these types of Visual Studio errors; Visual
Studio is a great program that isn't perfect.
Adding a New C++ Source Code FileThe first thing you should notice when
your project is created is the ''Solution Explorer'' window on the
right hand side of your Visual Studio screen. If you do not see the
Solution Explorer, or later decide to close this window, you can reopen
it by choosing Solution Explorer in the VIEW menu (or type Ctrl+Alt+L).
In this window you can see that your project is created as part of a
''Solution'' under the same name (if you didn't define a different
name). Also note that your project has several separate folders:
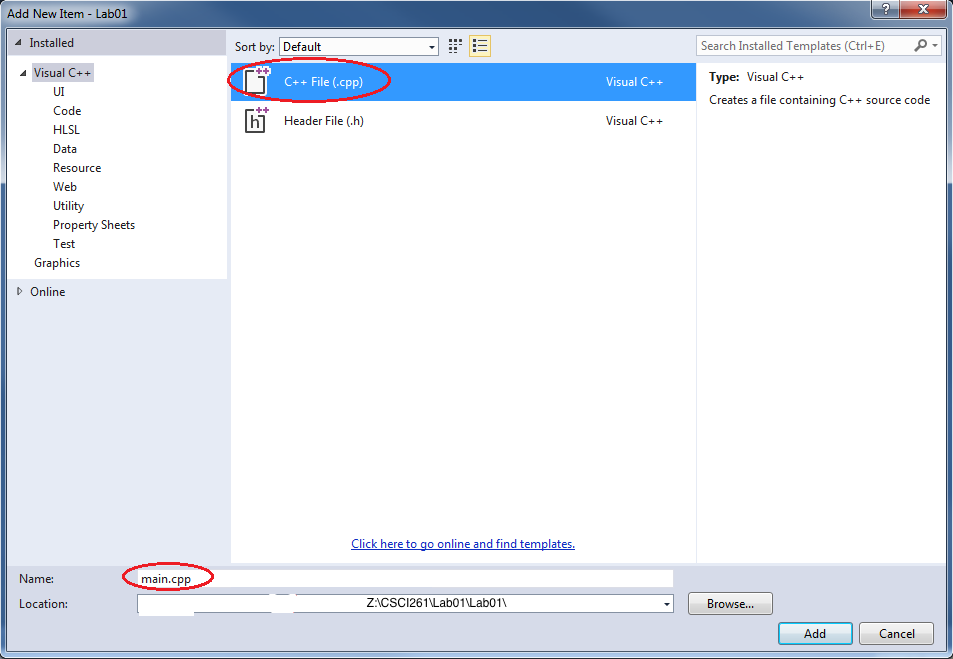
We will learn more about these later. For now, your task is to create a
source file named ''main.cpp''. Right click your project's Source Files
folder (in the Solution Explorer window) and chose Add - New Item from
the context menu (or type Ctrl+Shift+A). The ''Add New Item'' wizard
window should open. At the center of the window, select ''C++ File
(.cpp)''. At the bottom of the window, configure your source code's
name and location (after reading the next paragraph).
The same rules we discussed for a
project's name apply for a source code's name as well. In most cases,
we will name the first source code file of a project simply ''main''.
(You do not have to include the cpp extension; Visual Studio will do
this for you automatically.)
Writing your CodeAfter you have successfully added a
new source code file, Visual Studio will automatically open the file
with a text editor. You can now start typing code. Sweet! Since this is
a programming class, not a typing class, enter the code between the
following lines with cut/paste:
/* CSCI 261 Lab 01A: XXXX (_GIVE_BRIEF_DESCRIPTION_HERE_)
 *
 * Author: XXXX (_INSERT_YOUR_NAME_HERE_)
 *
 * More complete description here...
 */

// The include section adds extra definitions from the C++ standard library.
#include <iostream> // For cin, cout, etc.

// We will (most of the time) use the standard library namespace in our programs.
using namespace std;

// Define any constants or global variables below this comment.

// Must have a function named "main", which is the starting point of a C++ program.
int main() {

  /******** INSERT YOUR CODE BELOW HERE ********/

  cout << "Hello world!" << endl; // print Hello world! to the screen

  /******** INSERT YOUR CODE ABOVE HERE ********/

  return 0; // signals the operating system that our program ended OK.
}
Next, edit all places where XXXX appears in your main.cpp file with the
appropriate information. When you are done, you can save main.cpp by
typing Ctrl+s. (Note: You might also want to remember Ctrl+Shift+S,
which is handy to save edits to multiple files.) Note the yellow
vertical bar (which means unsaved lines) changes to green once save
completes. Also note the line numbers in your text editor to the left
of your code; if you don't see line numbers, go back and make sure you
completed all steps in Lab 00.
Running your CodeThe easiest way to compile and execute
your project is to type Ctrl-F5. The first time you do this (or anytime
you change your source file), Visual Studio will say "This project is
out of date. Would you like to build it?" The correct answer is, of
course, Yes!
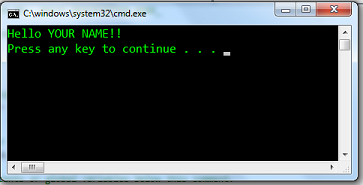
Whoa - what happend? Something flashed
and disappeared! What was that?!? Because this is a console-type of
project (i.e., print something to the console), the console window will
pop-up really fast and then disappear when you type Ctrl-F5. To
configure your project to pause the output after an execution,
right-click your project (e.g., Lab01A) in the Solution Explorer window
and select ''Properties'' from the context menu. Your project's
''Property Pages'' window should open. From the left side, select
Configuration Properties - Linker - System. From the center of that
window, change the ''SubSystem'' option to ''Console
(/SUBSYSTEM:CONSOLE)''. Then click apply, and then OK. Now if you run
your code again, the console window should pause showing your program's
output (see below. Your's will say world! instead of YOUR NAME).
The Iterative ProcessNow that your program is running, we
are going to add two more output statements following the "Hello
world!" line. Add a second cout statement that prints
How are you?
Run your program again to verify you
are seeing the new output on the screen. Finally, add a third line to
print (note the spaces)
(I'm fine).
Run your program again. When you are
complete, your program should output
Hello world!
How are you? (I'm fine). You just went through a short
iterative process, or as programmer's say an incremental build. Once
you knew you had your program running properly, you made a small change
to the program and reran the program to verify the change was correct.
Once again, a small change was introduced to the code and the program
was run to verify the proper output. You should become very familiar
with this process as it will make future projects go smoother if you
make small changes at a time.
This lab taught you how to create a C++ Visual Studio project from
scratch and output statements to the screen. You need to know how to
create an empty project from scratch. Thus, feel free to create a
second new empty console project for grins (i.e., do this lab a second
time when you start Lab01B).
Lab Submission
You will submit your
solution to this lab with your first official homework assignment (Assignment 01). Detailed instructions
for doing this are posted in Assignment
01.
Optional Material: Details on the Visual Studio InterfaceThe default interface can be described
in five sections: the menus, toolbars, Solution Explorer, Code Window,
and Output Window.
The menus have the same functionality
of most Microsoft Windows programs (e.g., Open File); there are,
however, menu items that are specific to programming.
The toolbars consist of a standard
toolbar and an adaptive toolbar. The standard toolbar will always be
available and has common buttons such as New Project, Open File, Save
All, etc. The adaptive toolbar will only appear when the Code Window is
open and other conditions are met. It contains buttons for common
programming functions such as indenting a line in your program and
writing a comment to describe your program.
The Solution Explorer is similar to
Windows Explorer, except focused on files that are related to an active
project. All of the code files associated with your project (i.e.,
program) will appear here. There are tabs at the bottom of the Solution
Explorer that bring up additional views useful in programming. (These
tabs will be discussed later.)
The Code Window is where you will
type/edit your C++ programs. It works similar to a text editor with the
bonus of syntax coloring and segment grouping. You can have multiple
code windows open - they will stack as tabs at the top of the Code
Window. These tabs allow you to easily jump between multiple files when
editing.
The Output Window keeps track of
information from the compiler. When you build your program (or code),
this window will list any problems that it found and give you tools to
help you find and fix those problems. Once again, there are multiple
tabs at the bottom of the Output Window for different views; we'll
discuss these tabs later. Below the Output Window is a status bar that
lists important messages, line numbers, column numbers, and certain
settings. Initially, your status bar should say "Ready".
This default view contains everything
you need to write and execute a program. The Solution Explorer will
keep track of the files in your project, the Code Window will let you
view and edit your program, and the Output Window will help you find
and fix syntax errors in your program.
This lab is due by
January 17, 2017 11:59PM.
| |
|
Last Updated: 01/01/70 00:00
|
