CSCI 261 - Programming Concepts (C++)Spring 2017 - Lab 00Quick Links: Blackboard | Canvas | CS @ Mines | Cloud9 | Piazza | zyBooks |
|
| | Home | Contact | Syllabus | Assignments | Schedule | Resources | | |
|
This lab is due by
January 11, 2017 08:00am.
Visual Studio SetupFirst, why is this lab zero instead of
lab one? Because computer scientists always start with zero! (This will
become more evident later in the semester ... there's a reason why we
do it!)
Before you begin working on any
programming project, you must set up some kind of "workspace" on your
computer. Software engineers call this "setting up your development
environment" or "setting up your dev-env". For this class, you will
need only one thing: an IDE (integrated development environment). To
begin, let's adjust your Windows configuration.
Adjust Your Windows Configuration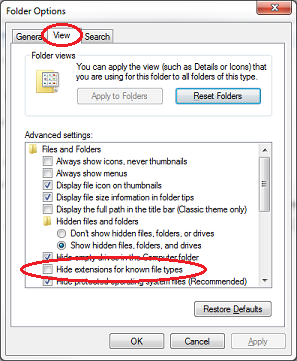
There are many things the Windows interface tries to hide from mere
mortals. Since you're a Mines student, not a mere mortal, you should
take off some of these training wheels. Specifically, unhiding file
extensions. Follow these steps:
If you're unsure of any of those steps, you can see it done in this video. Maybe Install Your IDE (Integrated Development Environment) at Home
Note: The availability of Visual Studio is only guaranteed in
our classroom locations and the CTLM Commons. However, many machines in
Brown Hall labs and other campus locations may work, but we do not
support or guarantee their functionality for this course.
The IDE is the main software
application used to type programs; we will use Visual Studio 2015.
Visual Studio 2015 is already installed on all lab machines.
There is no need for you to download and install it.
However, if you'd like to set up your own personal computer to work on
course projects (especially on Friday and Saturday night programming
parties) then you will need to download and install the software. We recommend
installing the Visual Studio Express for Desktop version, which
is free. (You must install the Desktop version
, not the Windows version.) When installing, choose all the
defaults. Many programmers call this a "next-next-next" installation.
How cute.
Have a Mac or a Linux box? You'll
first need to install virtualization software such as VMWare Fusion or
VirtualBox (easily found via Google). Second, you'll need to install
Windows as a virtual machine: see the CTLM help desk for a free license
(politely tell them you're a CSCI261 student). Then, within this
virtual machine you can install Visual Studio C++ 2015 Express.
Another option: install CodeBlocks at home and learn a 2nd development
environment. (Once you learn one, others are pretty easy.) Moving your
code between Visual Studio on campus and CodeBlocks at home is pretty
simple (in most cases). Note: for most students, using CodeBlocks on a
Mac/Linux machine will likely be easier for you than installing a
virtual machine and then Visual Studio.
There exist other options as well: XCode for
Mac, Eclipse
CDT for all Operating Systems (this is also installed on the lab
machines). Or create a workspace on Cloud9.
Configure Your IDE
Use the Start menu to launch Visual Studio 2015 (from the "All
Programs" list). Do not select Blend for Visual Studio. The application
may ask you to Sign in to Visual Studio Online; choose "Not now,
maybe later". Also, the first time you launch the application,
especially in the campus labs, it may ask you to specify what language
you will be programming. Select Visual C++. Then choose your preferred
color scheme. (To change color scheme later, choose Tools and then
Options; the color scheme is under Environment/General.)
By default, Visual Studio does not
display line numbers next to your code listing. Line numbers are
extremely important to programmers. It seems Microsoft decided to play
a joke on us by not showing line numbers in our code by default (very
funny, Microsoft).
To turn on line numbers, in the main menubar at the top of the Visual
Studio window, click "Tools" then "Options...". This will open a window
which allows you to change many of your IDE's settings. Leave this
window open for the next four steps!
On the left side of the options window, click "Text Editor" then "All
Languages." Now make sure the checkbox labeled "Line numbers" is
checked. It should look like this when you are done:

Code "style" is a sensitive subject among programmers.
Style refers to things that do not matter to the computer executing
your program, but can make a huge difference to humans trying to read
your program (in particular, your instructors). We will discuss many
style issues as the semester progresses, but for now we will address
spaces, tabs, and indenting. Your IDE can try to indent your code for
you and it actually does a pretty good job if configured properly.
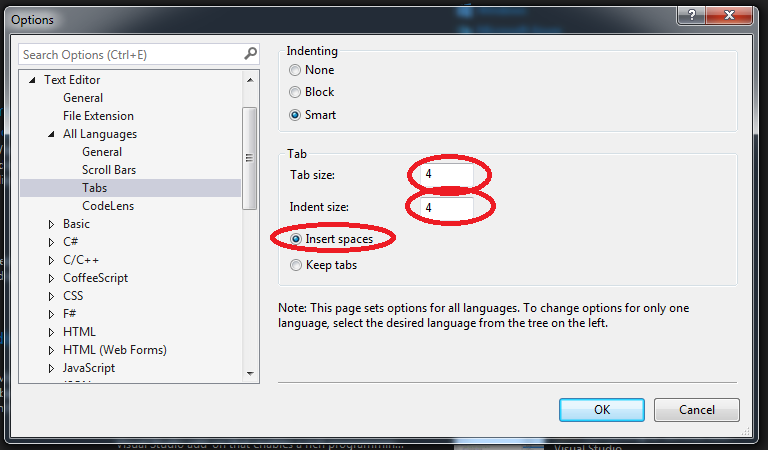
If you closed the Options window from the previous step, re-open it
now. This time, click the arrow next to "All Languages" and then click
on "Tabs". Set both the tab and indent sizes to four, and select
the "Insert spaces" option. It should look like this when you are done:
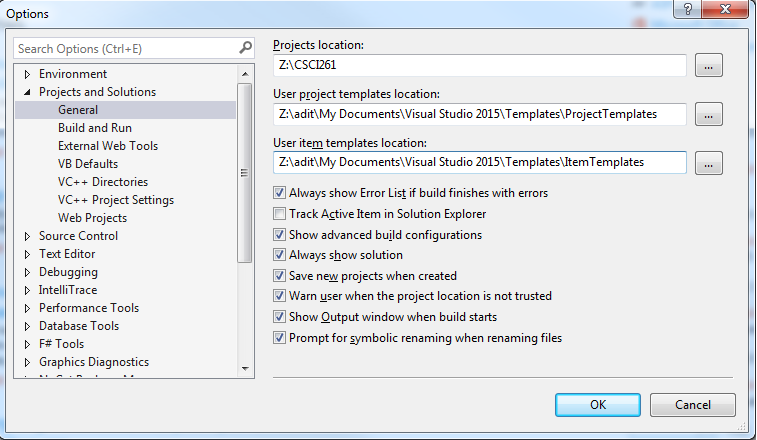
We now want to set the default folder locations for our development (to
save us time in the future). If you closed the Options window from the
previous step, re-open it now. This time, click the arrow next to
"Projects and Solutions" and then click "General". In the first
location (for "Projects location"), replace the default location with
"Z:\CSCI261". In the next two locations, do not delete the whole path
given. Instead, replace the reference to "\\hornet" with "Z:\adit".
When you are finished the three locations should look like the
following image:
Finally, each time you make changes to
your code, the IDE will rebuild the executable (this will make more
sense after a few lessons). However, if there are errors, you most
likely need to fix these errors before continuing. Some developers may
want to run a previous version of their code, so Microsoft gives us a
choice. In this class, we will always want to fix our errors before
continuing, so let's select that option.
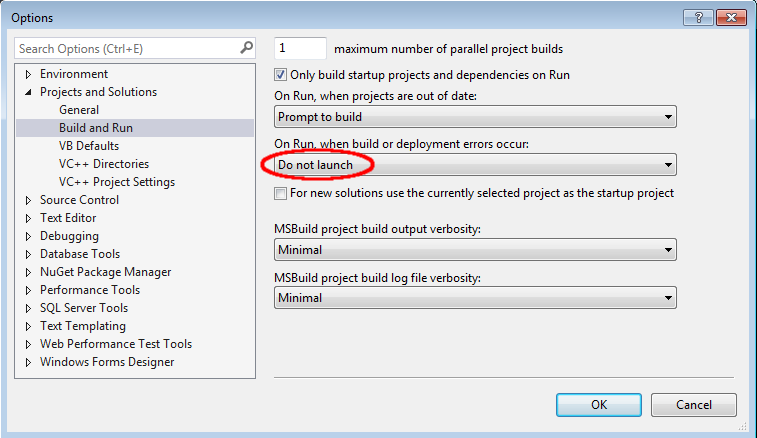
If you closed the Options window from the previous step, re-open it
now. This time, click the arrow next to "Projects and Solutions" and
then click on "Build and Run". In the middle of the right side, for the
"On Run, when build or deployment errors occur" option, select "Do not
launch":
We will likely do more configuration
as the semester progresses, but this is enough for now.
Test Your SetupWe will test your setup on Wednesday,
with Lab01A.
This assignment is due
by January 11, 2017 08:00am.
| |
|
Last Updated: 01/01/70 00:00
|
