This assignment is due by Wednesday, February 05, 2025 by 11:59pm.
For this assignment, you will make an app that calculates how many pizzas a user needs based on the hunger level of their guests. You will need to implement the necessary resources, MVVM, and event listeners to accomplish this task.
When you create this project, set the package to include <userName_A1> and name the app <userName>_A1 where userName is your name (for instance, mine would be jpaone_A1).
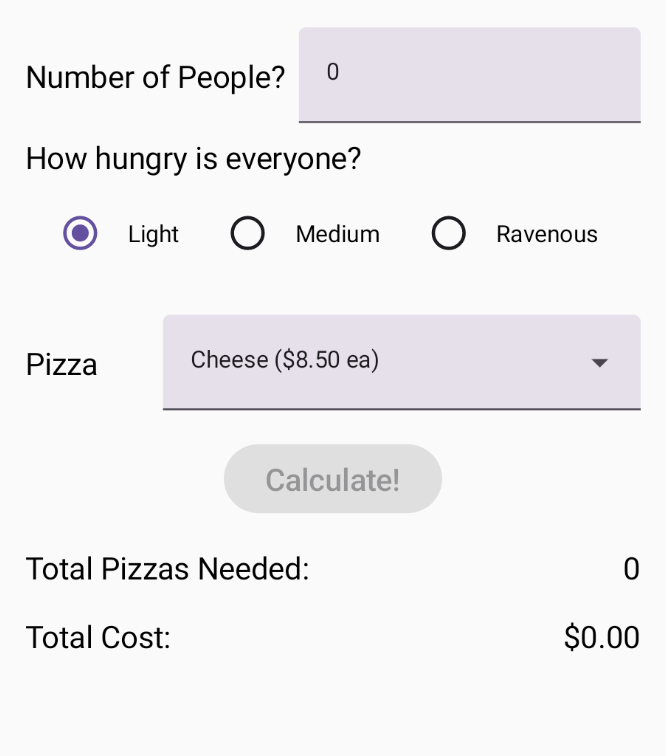
An example of the completed app is shown below:
Part I - Model: Create the Pizzas
Begin by creating the concept of a Pizza within the Model. Be sure to follow the package structure as laid out in the labs. The Pizza entity only needs to contain the name of the pizza and the associated cost per pie.
Now, create your Pizza repository and have it contain at least 6 different pizzas that each are different names and prices.
Part II - View: Create the Layout
The full layout is shown below.

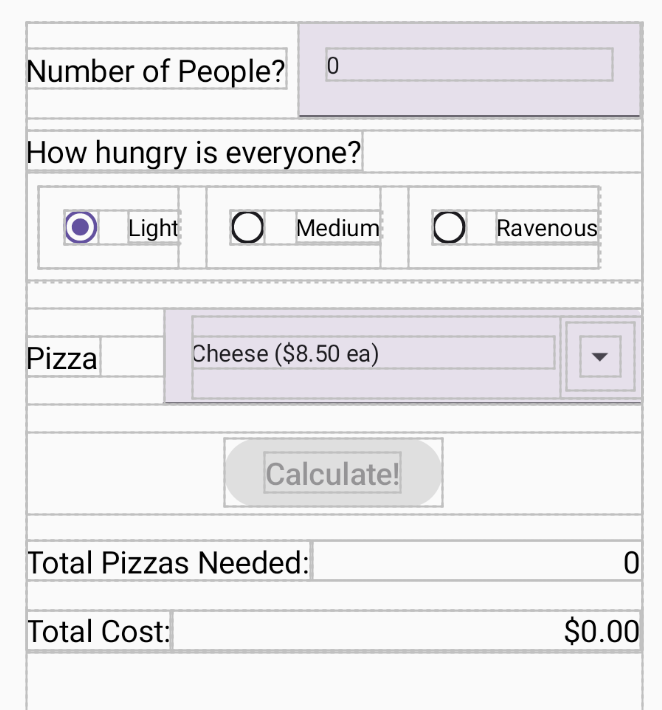
This time, there isn't a tree to traverse to build it up. You will need to create the container and element structure by breaking the image into components.
As a hint, the following image shows the layout bounds of the individual composable elements.

How those all go together is for you to organize. It is recommended that you encapsulate each row of the column into its own composable function (and file). This way you can test each individual component. Be sure to create a corresponding Preview composable for each element you construct.
You may need to do some additional research
as to how each of the components work and are structured. For instance, there is not a RadioGroup composable, but there is
RadioButton. You'll need to create your own group that works together.
As you are building up the layout, you'll need to make sure you are creating the appropriate string resource for each piece of text.
Part III - View Model: Add the State & Presentation Logic
Next, we'll wire up everything up. The calculate button will take the values from the Number of People, How Hungry, and Pizza inputs to calculate the number of pizzas needed. Each of those inputs are backed by a single source of truth represented by the state information in the View Model. Remember that our state flows down while events flow up. Think about what the appropriate input to each composable element should be (is it state data or raw data?).
When the calculate button is pressed, this kicks off the View Model computing the number of pizzas needed and the associated cost. The How Hungry radio buttons determine how many slices each person will eat.
- Light Hunger - 1 slice per person
- Medium Hunger - 2 slices per person
- Ravenous Hunger - 4 slices per person
Once we know the total number of slices needed for all people, we can now compute the number of pizzas needed. Each pizza is comprised of 8 slices and we can only order whole pizzas. Thus if there are 9 medium hunger people, then 18 slices are needed or 3 pizzas. Display the number of pizzas needed in the appropriate composable.
After we know the number of pizzas, we'll then calculate the total cost. Display the cost for all the pizzas, with a $ and two decimals, in the appropriate composable.
All of the data and logic should be contained within the View Model. To recap the role of each layer, see below:
- Data Layer
- Model: Contains the repository of pizza entities
- Presentation Layer
- View: Displays the data (number of people, hunger level, selected pizza, number of pizzas, cost)
- View Model: Contains the set of pizzas from the Model, all state data, presentation logic to update state
Part XC - Extra Credit
There are three extensions you can do for extra credit (you are free to add as many as you wish):
- Add in validation for our button. Currently, we are assuming the user will enter a positive number of people and hunger level before pressing the calculate button. Have the button only be enabled, and therefore clickable, after the user has entered all the required inputs appropriately. Finally, if the user clears out a field then the button should again be disabled.
- When the user first comes into the app, and they haven't entered any people yet, hide the total pizza and total cost information. After the user presses the calculate button for the first time, display this information.
- Allow each pizza to contain a different number of slices. This will affect your number of pizzas calculation.
The video below shows the extra credit in action.
Part IV - Exit Interview
Be sure to include a
README.txt
file containing any comments, notes to run, etc. In addition, answer
the following questions in your
README.txt:
- How did you handle prepending the $ symbol to the total cost?
- How did you implement the RadioGroup and Dropdown? What resource(s) did you use? What additional information did you need to track?
If you did any of the extra credit options, then also answer the following questions for each extra credit feature (if you implemented two of the extensions, then you would answer these questions twice):
- What state information was needed to implement this feature?
- Which components of MVVM were needed to be modified to implement this feature?
- What type of logic was necessary?
Grading Rubric
Your submission will be graded according to the following rubric.
| Percentage | Requirement Description |
| 15% | Model: Pizza class and Repository created correctly. |
| 15% | View: Layout matches the provided image. |
| 15% | View Model: Data retrieved from Model and provided to View. Associated presentation logic contained within. |
| 15% | State flows down, Events flow up. |
| 15% | String resources used correctly. |
| 10% | App UI/UX as expected (number of pizzas and cost calculated correctly). |
| 5% | App structured correctly (MVVM layers, package & file structure). |
| 5% | Exit Interview questions from Part IV are answered and included in README.txt file.
|
| 5% | Submission is complete, compiles and executes without error. |
| +2% | Button is enabled/disabled based on input. |
| +1% | Totals initially hidden. |
| +2% | Pizzas are comprised of a different number of slices. |
Submission
Please update your project so it produces an executable with the name userName_A1. When you are completed with the assignment zip together your full source code (the entire Android Studio project), and README.txt. Name the zip file, userName_A1.zip. Upload this file to Canvas under A1.
This assignment is due by Wednesday, February 05, 2025 by 11:59pm.