This is an individual exercise. NOTE: This exercise is due at the beginning of class on the specified due date - it is not an in-class exercise.
In this lesson you will practice creating branches, moving
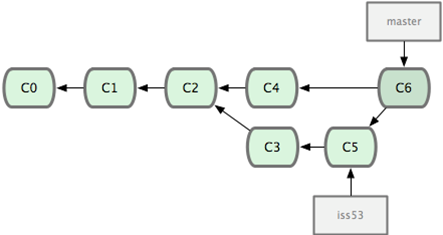
between branches, and merging. The only thing you will turn
in (hard copy) is a drawing that shows the branches you created.
Format will be similar to the figure below. You should create your drawing as you walk
through the steps below.
Create your DrawPlay project in Eclipse. Then create a repository
and commit the src files. Remember to place a .gitignore file in your
project folder. You do not need to use GitHub for this exercise.
Be sure to update your drawing with this initial commit (this would be like C0 on the example slide).
In this step you'll update your code and commit.
Add this code as instance variables in your Cat class:
	// whiskers are about 1/4 the size of the head
	private static final int WHISKER_LENGTH = HEAD_DIMENSION/4;
	private static final int WHISKER_SLANT = 5;
	private static final int NUM_WHISKERS = 3;
And update the draw function:
		// Draw whiskers
		g2.setColor(Color.white);
		// Draw whiskers on the left of face
		// -2 draws whisker just to left of mouth
		x = catX + MOUTH_X - 2;
		// x2 is the other endpoint, depends on length of whisker
		int x2 = x - WHISKER_LENGTH;
		// whiskers all start at the same "height" as the mouth, centered
		y = catY + MOUTH_Y + MOUTH_HEIGHT/2;
		// -5 gives a slight slant
		int y2 = y - WHISKER_SLANT;
		for (int i=0; i<NUM_WHISKERS; i++)
		{
			g2.drawLine(x, y, x2, y2);
			y2 += WHISKER_SLANT;
		}
		// Draw whiskers on the right of face, y stays the same
		x = catX + MOUTH_X + MOUTH_WIDTH + 2;
		x2 = x + WHISKER_LENGTH;
		y2 = y - WHISKER_SLANT;
		for (int i=0; i<NUM_WHISKERS; i++)
		{
			g2.drawLine(x, y, x2, y2);
			y2 += WHISKER_SLANT;
		}
Sometimes you want to return to a previous version. You will use
the hash shown in your git log. Do the following steps.
Note: in this example we're just going back to look at prior code, then coming forward again. There are other options, you may want to review http://stackoverflow.com/questions/4114095/git-revert-to-previous-commit-how.
git checkout [hash code], where [hash code] corresponds to your
original commit. Note that you don't need to
type in the entire hash, e.g., I type in git checkout 15d9git checkout [hash from your second commit]NOTE: This can be confusing, because it can seem like files have disappeared. Be sure you're comfortable with what's happening here! Nothing to add to your drawing, as we'll move forward from your second commit.
In this step you'll create a branch that contains a mouse.
addmouse (refer back to ppt or demo if you've
forgotten the command)Mouse class (code below)MyDrawing program.
Mouse variable. paintComponent. I draw
the mouse at location 100, 200, your location may vary.git status, note both modified and untracked filesgit status
import java.awt.Color;
import java.awt.Graphics;
import java.awt.Graphics2D;

public class Mouse {
	private static final int BODY_LENGTH = 50;
	private static final int BODY_HEIGHT = 20;
	private static final int TAIL_LENGTH = 40;
	public void draw(Graphics g, int mouseX, int mouseY)
	{
		Graphics2D g2 = (Graphics2D) g;
		g2.setColor(Color.gray);
		g2.fillOval(mouseX, mouseY, BODY_LENGTH, BODY_HEIGHT);
		int x = mouseX + BODY_LENGTH;
		int y = mouseY + BODY_HEIGHT/2;
		int x2 = x + TAIL_LENGTH;
		g2.drawLine(x, y, x2, y);
		// text appears below mouse body, +10 places below
		// so it doesn't overlap the drawing
		g2.drawString("Squeak", mouseX, mouseY+BODY_HEIGHT+10);
	}
}
This is similar to the hotfix example. You should:
git checkout -b catearsAnother constant
	// ears are about 1/5 the size of the head
	private static final int EAR_SIZE = HEAD_DIMENSION/5;
Update draw function
		// Add ears
		g2.setColor(Color.LIGHT_GRAY);
		// Draw left side of left ear
		x = catX + HEAD_DIMENSION/5;
		x2 = x + EAR_SIZE/2;
		y = catY + HEAD_DIMENSION/5;
		y2 = y - EAR_SIZE;
		g2.drawLine(x, y, x2, y2);
		// Draw right side of right ear
		// Note that we reverse x/x2 and y/y2
		x = x2 + EAR_SIZE/2;
		g2.drawLine(x2, y2, x, y);
		// Draw left side of right ear
		x += HEAD_DIMENSION/5;
		x2 = x + EAR_SIZE/2;
		g2.drawLine(x2, y2, x, y);
		// Draw right side of right ear
		x = x2 + EAR_SIZE/2;
		g2.drawLine(x2, y2, x, y);
In this step you will finish working on the mouse and merge the mouse into the master.

Create and merge another branch of your choice. For example, you might add another animal, make changes to existing code (e.g., change colors or shapes), etc. Be sure to avoid conflicts, we'll cover that in a future exercise. (kudos if you do generate conflicts then figure out on your own how to handle). Update your drawing appropriately.
Git log has a number of options that will display the branch structure for you. Do a google search and experiment.