Choose the appropriate download for your operating system. These zip files contain a complete CLion project directory that can be opened directly in CLion, and which will (hopefully) just work without any additional tweaking (see Notes below).
This project will use the SFML graphics library, which can be a bit tricky to set up and configure, which is why we are providing a self-contained project folder for you. If you are not using CLion, you can still do the project, but it will take some more work (see Notes below).
The provided CLion project should work on the school computers as is; if not, it is possible that the school has updated the MinGW compilers on the school computers, in which case the SFML libraries included in the project may be the wrong version. If this happens, please let me know ASAP so I can figure out the best fix!
If you have CLion on your own computer, it is also possible that you have gotten a newer version of MinGW than SFML was compiled for. If that happens, the easiest fix is to download version 6.1.0 of MinGW; unzip it anywhere on your computer (I like C:\) and then launch CLion; go into Settings... from the File menu and find Toolchains under Build, Execution, and Deployment in the left-hand pane. In the right hand pane, use the drop down to choose the MinGW directory you just created. The project should then work correctly.
This project has been tested under Mac OS X High Sierra, with the latest version of XCode. In theory, though, it should just work under any recent OS X (10.7 or later).
This project has been tested under Linux Mint 19 (based on Ubuntu 18.04). The basic code has also been partially tested under Ubuntu 16.04. In both cases, all necessary dependencies seem to be in place, so in theory, most up-to-date linux installs should work with the provided project. Of course, there are so many linux distros that it is impossible to guarantee this across the board.
If you are using linux (or Cloud9) and not using CLion, then your best bet is to grab just the source code from the linux project, download this Makefile, and install the libsfml-dev package via your package manager. You should then be able to build the program via make. Note if you are on Cloud9, to see the graphical window for this project you will also need to run c9vnc.
The PPM (or Portable Pix Map) image format is encoded in human-readable ASCII text. For those of you who wish to have the experience of reading real documentation, the formal image specification can be found here.
     P3
     4 4
     255
     0   0 0     100 0   0      0  0  0     255  0   255
     0   0 0     0   255 175    0  0  0     0    0   0
     0   0 0     0   0   0      0  15 175   0    0   0
     255 0 255   0   0   0      0  0  0     255  255 255
You can think of the image as having two parts, a header and a body. The header consists of four entries:
     P3
     4 4
     255
"P3" is a "magic number". It indicates what type of PPM (full color, ASCII encoding) image this is. For this assignment it will always be P3.
Next comes the number of columns and the number of rows in the image (4 x 4). Note: Columns come before rows!
Finally, we have the maximum color value 255. This can be any value, but a common value is 255. For this assignment, we'll assume it is always 255.
Note that the header here is presented in a particular format; magic number on the first line, columns and rows on the second line separated by a space, and color depth on the third. While this is the usual way (and your saved images should follow this format for easier debugging), there is no particular requirement in the standard other than that each element is separated by whitespace. In particular, you should not assume the files you will be reading follows the line-by-line format above.
The image body contains the actual picture information. Each pixel of the image is a tiny, colored square. The color is determined by how much red, green, and blue are present. So, 0 0 0 is the first color of the image, which is black, and the last pixel in the image is 255 255 255, which is white. By varying the levels of the RGB values you can come up with any color in between.
Note that color values must be separated by a space, but after that additional whitespace is ignored by the image viewer. In the sample ppm above we used additional whitespace to format the image so that it is easy for a human to understand, but the computer doesn't care if everything is on one line, if there is one line per line of the image, or some mix (we suggest your outputs should keep 1 line of text = 1 line of the image for this assignment to make the images easier to read in a text editor).
The example image above would look something like this:
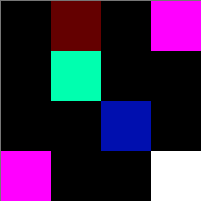
Keep in mind, each square is one pixel, so the real thing is much smaller (the rendered image was blown up by 5000%).
While PPM files are easy to view as text (you can use a text editor, for instance), and easy to work with in code, they are highly inefficient. Most modern image formats use some kind of compression to make their size reasonable while preserving the image appearance. This is not to say that PPMs don't still have some life in them - one modern use for PPM is as an intermediate format when converting images from one type to another.
Unfortunately, PPM images are not understood natively by many platforms, including Cloud9 and Windows. If you want to view the images outside the program you will be making, there are software packages that will read and edit them, such as GIMP (which should be on the school machines). Because of this limitation, the software you create will include an image viewer built on top of the SFML graphics library.
You are going to create a simple editor for applying effects to images. This may sound like a lot of work, but it's really pretty simple. To make it easy to code up I suggest you tackle the problem in parts; in the first part, concentrate just on reading in the image file and writing it back out without making any changes to it. Next, get the image to display in the graphical window. Then you can worry about getting individual effects to work.
When the program first runs, it will prompt the user for the name of an image file to work with initially. The file will be a text file in PPM format as described in the discussion above. Note the user interface aspects of this have already been written for you in main.cpp; your job is to finish up the code in image_editor.cpp (specifically the load method, which we've started for you).
The load method needs to read in the image header and all of the image data from the provided input stream (the code in main.cpp opens the actual file for you), and store the image data in some fashion in your image_editor object (see below for details). If there are any errors in loading, then the method should return false, otherwise it should return true - this will let the user interface code in main.cpp know whether or not to prompt the user for a different file.
After the initial image load, the user will see a menu prompting them to either apply effects to the image, load a new image, save the image, or quit. Every time the user chooses to load, the image_editor::load method is called.
Similarly, if the user chooses to save, the image_editor::save method is called, with a valid output file stream passed in as a parameter. In this case, your code should write out all the elements of a valid PPM file to the output stream - all of the header elements and the pixel data.
Initially, your program will display a bogus test image that has nothing to do with the file you load in. Getting the image to display properly is relatively easy; you just need to replace the code in the get_rows, get_columns, get_red, get_green, and get_blue methods of image_editor. The first two methods should just return the rows and columns values you read from the file header (and probably stored somewhere in your image_editor object). The last three methods return just the red/green/blue values for a pixel (specified by row and column), which you can get from the stored image data.
The user will be presented with a list of effect filters that can be applied (code implementing the user interaction is supplied to you). Each of these filters involves some simple manipulation of the red, green, and/or blue values in the image. You should put each of the filters in its own method.
For example, one filter will correspond to the option "negate red". It will change just the RED color numbers into their "negative". That is, if the red number is low, it should become high and vice versa. The maximum color depth number is useful here. If the red were 0, it would become 255; if it were 255 it would become 0. If the red were 100, it would become 155.
When you have this filter written, insert it into your code and try it out. Apply the effect to one of the provided sample images, and see if the output looks as you expected. Create similar filters for the other color values. Then proceed with the remaining filters:
In summary, you must implement the following effect filters:
Files have been created for you implementing main(), and the beginnings of a class which you can complete to implement the various image editor functions. You can freely change any of the code as you need or desire, although you should be able to complete this project with changes only to image_editor.h and image_editor.cpp.
As a first step, please read through the code in image_editor.h and image_editor.cpp before reading the sections below, so you have a sense for the program design we are looking for. Comments are scattered throughout the code starting with "TODO" - these are hints to you as to what code you need to add to make a working program.
The code as provided should compile and run - it is recommended that you work incrementally, adding in one method at a time and testing your code - it is a bad idea to try to write it all at once and only then try to compile and test!
Note that once you read in the header information, you know exactly how many integers you need to read from the rest of the file! Reading in integers is most easily achieved by using the >> operator on the file input stream into an int variable. This will look for the next contiguous chunk of non-whitespace characters and try to turn it into an integer.
You should probably use vectors to store your image data. There are many ways to go here - you can store the image data in a 2-D grid (vector of vector of ints); some people go 3-D (rows x columns x 3); still others create a class or struct to represent a pixel, and do a 2-D grid of pixel objects. Whatever makes the most sense to you is fine.
Here are some hints on using vectors in this project. First note that simply declaring a vector object creates a data structure of size zero; if you try to write or read a location in this structure, you will get an error:
    vector<vector<int>> data;
    data[0][0] = 0;  // ERROR
If you create an empty vector in this way, you must build it up using the push_back() method to add in each new element:
    vector<vector<int>> data;
    for (...) {
        vector<int> row;
        for (...) {
            // read in some value
            row.push_back(some_value);
        }
        data.push_back(row);
    }
Note you should probably clear the vector every time load is called, to get rid of any old image data.
Since your data is stored in an instance variable of the same object as your effect filter method, you can simply loop over the rows and columns (or whatever is appropriate) and directly change the values using the [ ] operator.
Implement any of the following for extra credit points.
As per course policy, you must submit with your source code a README file. This file is just a plain text file (traditionally named README or README.txt). Your README must contain the following:
| README | 5 points |
| Program compiles and executes | 5 points |
| Code conforms to the course style guideline | 5 points |
| Program reads and displays images correctly | 10 points |
| Program saves files correctly | 5 points |
| color negation | 10 points |
| flatten color | 10 points |
| convert to grayscale | 10 points |
| flip horizontal/vertical | 10 points |
| extreme contrast | 5 points |
| Total: | 75 points |
| Extra credit: enlarge/reduce | +1 point each |
| Extra credit: rotate | +1 point |
| Extra credit: blur/sharpen/etc. | +1 point each |
| Extra credit: your original effect | +??? points |
Submit a zip file on Canvas containing:
Note: While you can just zip up your entire project directory, that takes up a lot of space, and requires extra work on our part, so it is appreciated if you can submit just the files mentioned above.
Original authors of this lab: Joshua T. Guerin and Debby Keen @ the University of Kentucky