→This assignment is due by Tuesday, November 30, 2021, 11:59 PM.←
→ As with all assignments, this must be an individual effort and cannot be pair programmed. Any debugging assistance must follow the course collaboration policy and be cited in the comment header block for the assignment.←
→ Do not forget to complete the following labs with this set: L7A,
L7B,
L7C
←
· Instructions · Rubric · Submission ·
Instructions
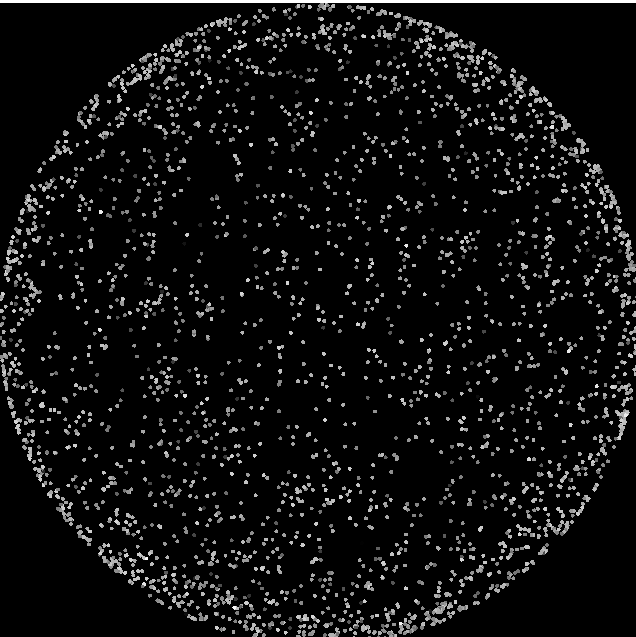
Your task for this assignment is to read in a star data file, store the data in a list of objects, make modifications to the data, and then draw a star map similar to the one shown here:
We'll begin by describing the data to store. Then the following sections will describe how to store and modify the data. The final sections will describe how to display the data.
Data File
To begin, use the appropriate SFML project template and place the stars.txt file in the data directory.
Each line of the data file contains information of one star, with each field separated by a tab. The meaning of each field (column) is described below. Note that data files often contain more information than is needed for a given purpose and that data files may contain outlying values that are also not needed for a given purpose. We suggest you take a look at the stars.txt file as you read the following details about your input file.
- The first three fields are the
x,y, andzcoordinates for the star. You will need to store thexandycoordinates, but will not need thezcoordinate. - The fourth field is the
brightnessof each star. - The fifth and sixth fields are the Henry Draper and Harvard Revised numbers for the star. These are numbers used in different star catalog systems, so they can be ignored for this assignment.
Star Class
We now need to create a class to store the data that represents a single star. Create a Star class in its own
header and implementation file. Our class must have the following members:
- A private data member to store the x coordinate
- A private data member to store the y coordinate
- A private data member to store the brightness value
- A default constructor that sets all data members to zero
- A parameterized constructor that sets each data member accordingly
- The corresponding public getter/setter methods
We now can read and parse the data file. While doing so, we will want to create a star object for each record. We will then store each object
in a vector of stars. However, we only want to create and store stars that have a brightness within the inclusive range of 0.0 to 8.0.
At this point your program should open, read, and store the valid stars into a vector of Star objects. The given star file has 3,521 valid stars to check your progress thus far.
Modify the Coordinates
We are able to store the stars with their data represented in the original format. We will need to manipulate the data to have it
in a form that will work with our program and ultimately be able to plot them visually. The first manipulation we do will relates to the (x, y)
coordinate the star exists at.
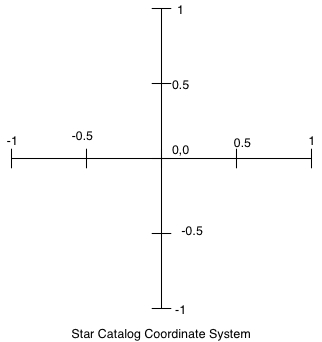
Each axis in the star coordinate system goes from -1.0 to +1.0 and the
origin (0, 0) is at the center. Thus, the x and y coordinate values for each star
will all be numbers in the range -1.0 to +1.0.
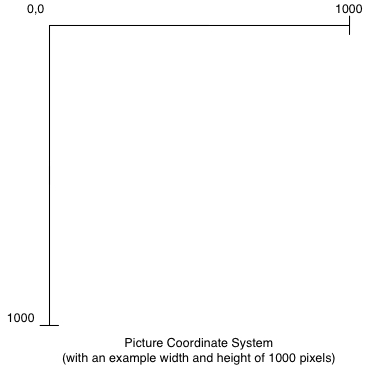
The coordinate system used in our graphics library (SFML)
has the origin (0, 0) in the upper-left corner
of the picture, and the maximum x and y values are the
width and height of the window, in pixels.
Thus, to determine the location of each star to draw in our graphics library,
you need to convert from the -1.0 to +1.0 range of the star
coordinate system to the (0, 0) to (WIDTH, HEIGHT)
range of the graphics library coordinate system. Declare
WIDTH and HEIGHT as constants in your program, with both values
set to 640 (which are defined for your screen size).
More specifically, if xStar is a double variable holding a star's x-coordinate
in the range -1.0 to +1.0, to convert it to an integer pixel value in the
range 0 to WIDTH, you would use the following:
xPixel = ( xStar + 1 ) * WIDTH / 2;Similarly, if yStar is a double variable holding a star's y-coordinate in the
range -1.0 to +1.0, to convert it to an integer pixel value in the range 0
to HEIGHT, you would use the following:
yPixel = ( -yStar + 1 ) * HEIGHT / 2;Note the minus sign on the yPixel equation. We encourage you to plug a few coordinates into these equations, e.g., (-0.5,0.5) and (-0.5,-0.5), to ensure the equations are correct.
Add two public functions to our Star class matching the following specifications:
getTransformedX()
Input: the WIDTH of the window
Output: a float
Task: compute the raw star x coordinate transformed in to the window coordinategetTransformedY()
Input: the HEIGHT of the window
Output: a float
Task: compute the raw star y coordinate transformed in to the window coordinate
To verify the modifications are correct, the first line of the stars.txt file is:
0.994772 -0.023164 -0.099456 4.610000 28 3If our window is sized 640x640, then the first star would be transformed to (638.327, 327.412).
Drawing a Star
In your code, you'll need to draw each star. Since stars look like circles, use the CircleShape class. Each circle needs a non-zero radius; use the setRadius function to set this to 2. Then, use this starShape object to draw each star with its corresponding properties (i.e., coordinates and brightness). For example, to set a star at position xPixel and yPixel use the following:
starShape.setPosition(Vector2f(xPixel, yPixel));A star can be drawn on the window using the following function call:
window.draw(starShape);We should now be able to successfully run our program and see a visualization of the stars, as seen below.
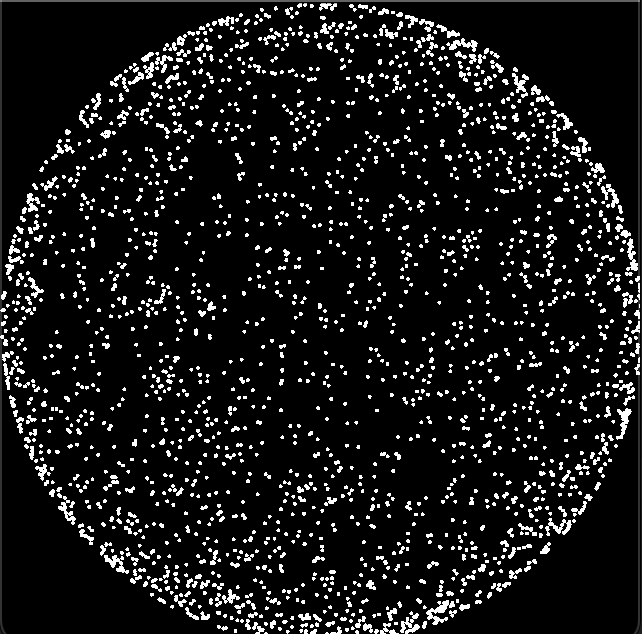
They are all placed in the correct position, but all equally bright. Read on about how the brightness will affect the coloring of each star.
Shades of Gray
One of the most common ways to represent colors is with the RGB color model. In this model, each color is represented with three numbers in the range 0 to 255 that represent the amount of red, green, and blue to include in the color. For example, (255,0,0) is the color red and (255,255,0) is the color yellow (i.e., red and green combined). Any color with the same amount of red, green, and blue is a shade of gray. We will use shades of gray to draw our stars with different brightness; thus, in this project, you should include the same amount of red, green, and blue in your colors drawn.
SFML has a Color class that allows the drawing of specific colors using the RGB model. For example, each of the following examples sets the fill color of a starShape to a different shade of gray:
// Black
starShape.setFillColor(Color(0, 0, 0));
// Dark gray
starShape.setFillColor(Color(64, 64, 64));
// Medium gray
starShape.setFillColor(Color(128, 128, 128));
// Light gray
starShape.setFillColor(Color(192, 192, 192));
// White
starShape.setFillColor(Color(255, 255, 255));
To determine the shade of gray for each star drawn in this project, you need to scale the brightness value of the star to an integer value between 0 and 255 and set the fill color using that value, as shown above. For example, if brightness is a double variable holding a star's brightness value in the range 0.0 to BRIGHTEST_STAR, to convert it to an integer value in the range 0 to 255, you would use the following:
int shadeOfGray = (int)( ( 255.0 * brightness ) / BRIGHTEST_STAR );You would then use this shadeOfGray variable to set the drawing color and fill color:
starShape.setFillColor(Color(shadeOfGray, shadeOfGray, shadeOfGray));However, we would much rather encapsulate this calculation within the Star class. Add another public function to your Star class with the following specifications:
getGrayscaleColor()
Input: the value of the brightest star from the list of valid Stars
Output: a SFML Color object
Task: create the grayscale Color based on the calculations above
Adding in the grayscale for each star will result in the following dimmed image:
This is completing the task, however we are interpreting the brightness values incorrectly. In the
star system format, 0.0 represents what should be the brightest star and a larger value signifies the darker
a star should appear. Therefore, when calculating the shadeOfGray value, we need to "invert" the value of the brightness
before performing the grayscale calculation:
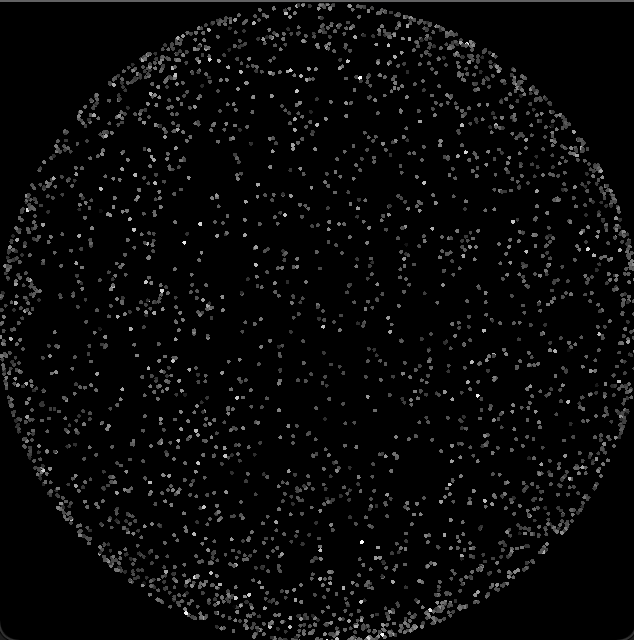
invertedBrightness = BRIGHTEST_STAR - brightness;Now when plotting the stars, the edge is dimmer and the brightest star is at the center of the map:
Grading Rubric
Your submission will be graded according to the following rubric.
| Points | Requirement Description |
| 6 | All labs completed and submitted L7A, L7B, L7C |
| +2 | L7A Extra Credit. |
| 6 | Star class created correctly. |
| 2 | Input file opened and read correctly. |
| 4 | Valid stars stored in appropriate vector. |
| 3 | Stars are colored in correct grayscale. |
| 3 | Stars are positioned properly. |
| 1 | Stars are sized properly. |
| 1 | Public data file generates correct image. |
| 2 | Private data file generates correct image. |
| 2 | (1) Comments used (2) Coding style followed (3) Appropriate variable names, constants, and data types used (4) Instructions followed |
| 30 | Total Points |
→This assignment is due by Tuesday, November 30, 2021, 11:59 PM.←
→ As with all assignments, this must be an individual effort and cannot be pair programmed. Any debugging assistance must follow the course collaboration policy and be cited in the comment header block for the assignment.←
→ Do not forget to complete the following labs with this set: L7A,
L7B,
L7C
←
Submission
Always, always, ALWAYS update the header comments at the top of your main.cpp file. And if you ever get stuck, remember that there is LOTS of help available.
It is critical that you follow these steps when submitting homework. You can view these steps by watching the Windows / Mac video.
If you do not follow these instructions, your assignment will receive a major deduction. Why all the fuss? Because we have several hundred of these assignments to grade, and we use computer tools to automate as much of the process as possible. If you deviate from these instructions, our grading tools will not work.
Submission Instructions
Here are step-by-step instructions for submitting your homework properly:
-
Make sure you have the appropriate comment header block at the top of every source code file for this set. The header
block should include the following information at a minimum.
Be sure to fill in the appropriate information, including:/* CSCI 261: Assignment 7: A7 - Stargate
* * Author: XXXX (INSERT_NAME) * Skip Days Used: #
* Skip Days Remaining: #
* Resources used (Office Hours, Tutoring, Other Students, etc & in what capacity): * // list here any outside assistance you used/received while following the * // CS@Mines Collaboration Policy and the Mines Academic Code of Honor * * XXXXXXXX (MORE_COMPLETE_DESCRIPTION_HERE) */- Assignment number
- Assignment title
- Your name
- How many skip days you are applying to this assignment (if you are applying none, still enter zero)
- The number of skip days you have left for the remainder of the semester (keep track of how many you have used across all assignments)
- If you received any type of assistance (office hours - whose, tutoring - when), then list where/what/who gave you the assistance and describe the assistance received
- A description of the assignment task and what the code in this file accomplishes.
- File and folder names are extremely important in this process.
Please double-check carefully, to ensure things are named correctly.
- The top-level folder of your project must be named
Set7 - Inside
Set7, create 4 sub-folders that are required for this Set. The name of each sub-folder is defined in that Set (e.g.L7A,L7B,L7C, andA7). - Copy your files into the subdirectories of
Set7(steps 2-3), zip thisSet7folder (steps 4-5), and then submit the zipped file (steps 6-11) to Canvas. - For example, when you zip/submit
Set7, there will be 4 sub-folders calledL7A,L7B,L7C, andA7inside theSet7folder, and each of these sub-folders will have the associated files.
- The top-level folder of your project must be named
- Using Windows Explorer (not to be confused with Internet Explorer), find the files
named
main.cpp, Star.h, Star.cpp.
STOP: Are you really sure you are viewing the correct assignment's folder? - Now, for A7, right click on the
main.cpp, Star.h, Star.cppto copy the files. Then, return to theSet7/A7folder and right click to paste the files. In other words, put a copy of your homework'smain.cpp, Star.h, Star.cppsource code into theSet7/A7folder.
Follow the same steps for L7A, to put a copy of your lab'smain.cppinto theSet7/L7Afolder. Repeat this process forSet7/L7B,Set7/L7C.
STOP: Are you sure yourSet7folder now has all your code to submit?
- Now, right-click on the
"Set7"folder.- In the pop-up menu that opens, move the mouse
"Send to..."and expand the sub-menu. - In the sub-menu that opens, select
"Compressed (zipped) folder".
STOP: Are you really sure you are zipping aSet7folder with sub-folders that each contain amain.cppfile in it?
- In the pop-up menu that opens, move the mouse
- After the previous step, you should now see a
"Set7.zip"file.
- Now visit the Canvas page for this course
and click the
"Assignments"button in the sidebar.
- Find Set7, click on it, find the
"Submit Assignment"area, and then click the"Choose File"button.
- Find the
"Set7.zip"file created earlier and click the"Open"button.
STOP: Are you really sure you are selecting the right homework assignment? Are you double-sure?
- WAIT! There's one more super-important step. Click on the blue
"Submit Assignment"button to submit your homework.
- No, really, make sure you click the
"Submit Assignment"button to actually submit your homework. Clicking the"Choose File"button in the previous step kind of makes it feel like you're done, but you must click the Submit button as well! And you must allow the file time to upload before you turn off your computer!
- Canvas should say "Submitted!". Click "Submission Details" and you can download the zip file you just submitted. In other words, verify you submitted what you think you submitted!
In summary, you must zip the "Set7" folder
and only the "Set7" folder, this zip folder must have several sub-folders, you must name all these folders correctly, you must submit the correct zip file for this
homework, and you must click the "Submit Assignment" button. Not doing these steps is like bringing your
homework to class but forgetting to hand it in. No concessions will be made for
incorrectly submitted work. If you incorrectly submit your homework, we will not be able to
give you full credit. And that makes us unhappy.
→This assignment is due by Tuesday, November 30, 2021, 11:59 PM.←
→ As with all assignments, this must be an individual effort and cannot be pair programmed. Any debugging assistance must follow the course collaboration policy and be cited in the comment header block for the assignment.←
→ Do not forget to complete the following labs with this set: L7A,
L7B,
L7C
←