→This assignment is due by Friday, February 18, 2022, 11:59 PM.←
→ As with all assignments, this must be an individual effort and cannot be pair programmed. Any debugging assistance must follow the course collaboration policy and be cited in the comment header block for the assignment.←
→ Do not forget to complete the following labs with this set: L2A,
L2B,
L2C,
L2D,
L2E
←
· Instructions · Rubric ·Submission ·
For this assignment you will do some simple image processing to create some pretty cool effects! In the process, we'll work with functions in a procedural manner.
Colors
Computers represent colors as a combination of three individual colors: red, green, and blue. These values correspond to an additive color space in which some combination of red and green creates yellow. If you wish to know more about the RGB color space, head over to Wikipedia.
We will read in the contents of an image file, manipulate the colors, and write out the contents for a new image file.
PPM Image Format
An image is an ordered arrangement of pixels. The pixels are arranged into a 2D grid with some number of rows and columns. Each pixel is made up of a combination of red, green, and blue as described above.
There are many different formats that an image can be represented in. PPM (Portable Pix Map) is one of the simplest image formats and all of the image information is stored in an ASCII text file.
A sample PPM file is shown below as viewed in a text editor:
P3
4 4
255
  0 0   0   100   0   0   0  0   0   255   0 255
  0 0   0     0 255 175   0  0   0     0   0   0
  0 0   0     0   0   0   0 15 175     0   0   0
255 0 255     0   0   0   0  0   0   255 255 255
The first value denotes the type of the PPM image (plain ASCII format) - this will always be the characters P3.
The next two values denote the width and height of the image - these will always be integers.
The next value denotes the maximum value of each color - this will always be an integer.
After that there will be height*width*3 values which correspond to the R G B values of each pixel in the image. The values are presented going across a row and then down the image.
The above example corresponds to the following image when viewed in an image viewing program:

If you open the same PPM file in VS Code, then you will see the ASCII text representation of the image. You need to open the file in an image editor to view the rendered version (either Preview on Mac or you can upload a file here to view it in a web browser).
Instructions
For this assignment, we will write a program to read in a PPM file, manipulate it, and then output a new PPM file.
Begin by prompting the user which file they wish to open. Two PPM images for you to use are provided
here: wallpaper.ppm & brick.ppm.
Additionally, give the user a third option for when grading takes place to open a third file called private.ppm.
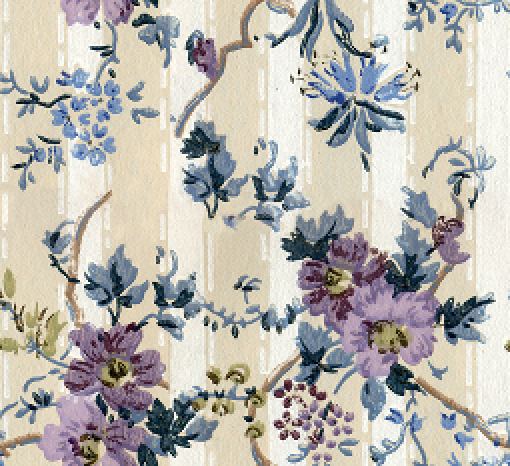
Based on the user's selection, open the corresponding file and be sure to check for any errors. Below is the wallpaper image.
The interaction should follow as below:
Which image to load?
  1. Brick
  2. Wallpaper
  3. Private
Enter 1, 2, or 3: 2

Opening wallpaper.ppm file
If the file cannot be found, kindly alert the user and gracefully end the program. This should be testable if you select option 3. Additionally, continue to prompt the user for a valid value if they provide something other than 1, 2, or 3 (a different number or potentially a character).
Which image to load?
  1. Brick
  2. Wallpaper
  3. Private
Enter 1, 2, or 3: t

Invalid input.

Which image to load?
  1. Brick
  2. Wallpaper
  3. Private
Enter 1, 2, or 3: 4

Invalid input.

Which image to load?
  1. Brick
  2. Wallpaper
  3. Private
Enter 1, 2, or 3: 2

Opening wallpaper.ppm file
Now we're ready to start reading in the file and read the data!
We'll need to read the first four values (two characters and three integers) to know the information about our
image. Upon reading the image type, validate we are reading a P3 image (there do exist other types, such as
P1,
P2,
P4,
P5,
P6, &
P7
). If we have anything other than P3, then alert the user the image is of the wrong type and gracefully end the program.
Continue reading the remainder of the header (height, width, max value). Once we have the height and width of the image, we can create nested for loops to read all of the pixel data. For each row and for each column, read the corresponding red, green, and blue values. Verify that you are reading in the correct values (use the debugger!).
Now that the file is being read properly, let's go back and ask the user which image processing technique they wish to perform:
- Convert to grayscale
- Invert the colors
Regardless of the user choice, we will write out a new PPM file in the format specified above.
Details on each manipulation are given below. When you write out the individual pixel color values to the file, apply the appropriate conversion to the corresponding pixel.
Convert to Grayscale
Name the new image file basefilename_grayscale.ppm. For instance, if the user entered
wallpaper.ppm then you would create a new file named wallpaper_grayscale.ppm.
To convert a color to grayscale, we want to average the three RGB values together and create a new pixel
where all three values are equal to the average. However, we don't want to just do (R+G+B)/3 because this
doesn't model how the colors appear in real life. Instead we will use a weighted average. Use the following equation
to compute the grayscale intensity to apply for an individual pixel:
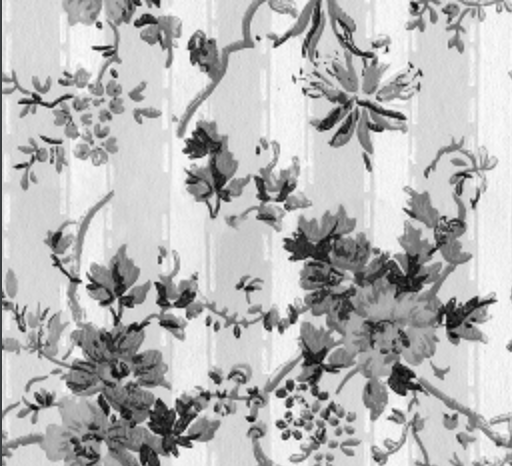
gray = 0.2989 * red + 0.5870 * green + 0.1140 * blueThe wallpaper image converted to grayscale is shown below.
Invert the colors
Name the new image file basefilename_inverted.ppm. For instance, if the user entered
wallpaper.ppm then you would create a new file named wallpaper_inverted.ppm.
When we invert a color, we need to find its complement (hey, nice color!). This is done by subtracting each color component from the max possible value.
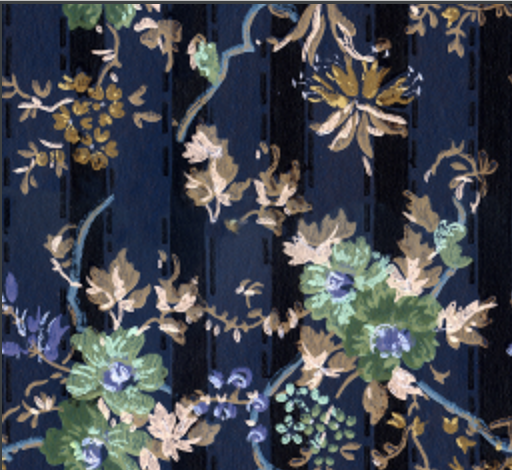
The wallpaper image with inverted colors is shown below.
Code Structure & Functions
We will want to implement this program in a procedural style using functions. These functions will be declared in a separate
ppm_functions.h file with their implementations defined in a corresponding ppm_functions.cpp file.
Be sure to update your Makefile to work with these new files. Create, and use, the following functions:
-
- Name:
print_file_options() - Input: None
- Output: None
- Description: Prints the options menu for which file to open.
- Name:
-
- Name:
print_operation_options() - Input: None
- Output: None
- Description: Prints the options menu for which file processing to perform.
- Name:
-
- Name:
get_user_input() - Input: minimum allowable integer value, maximum allowable integer value
- Output: integer value chosen
- Description: Prompts the user to enter a value. Validates the entered value is (a) an integer (b) within the inclusive minimum-maximum range. If both (a) and (b) are satisfied, returns the value entered by the user. If (a) fails, clears the error and continues to prompt the user for a valid value. If (b) fails, continues to prompt the user for a valid value.
- Name:
-
- Name:
open_files() - Input: an
ifstreamobject to open, anofstreamobject to open, an integer corresponding to the file to open, an integer corresponding to the operation to perform - Output: true if both files successfully opened, false otherwise
- Description: Opens the corresponding files for reading and writing based on the file and operation chosen. Verifies that both files successfully opened, returning true if so. Otherwise if either file failed to open, returns false.
- Name:
-
- Name:
read_header_information() - Input: an
ifstreamobject to read from, integers corresponding to the width height & max value in the image passed by reference - Output: true if valid type, false otherwise
- Description: Reads the header block of the file (the first four values). Returns true if the
PPM type is
P3, false otherwise. Upon completion, the parameters corresponding to the width, height, & maximum value will correspond to the values read from the image.
- Name:
-
- Name:
write_header_information() - Input: an
ofstreamobject to write to, integers corresponding to the width height & max value in the image - Output: None
- Description: Writes the header block of the file (the first four values).
- Name:
-
- Name:
read_and_write_modified_pixels() - Input: an
ifstreamobject to read from, anofstreamobject to write to, integers corresponding to the operation to perform and width height & max value in the image - Output: None
- Description: Reads all the pixel data from the input file. For each pixel read, writes to the output file the modified pixel value based on the selected operation.
- Name:
Hints
A full example interaction is below:
Which image to load?
  1. Brick
  2. Wallpaper
  3. Private
Enter 1, 2, or 3: 1
Which process to apply?
  1. Grayscale
  2. Inversion
Enter 1 or 2: 1
Opening brick.ppm file
Writing brick_grayscale.ppm file
You'll want to follow the high level pseudocode given below:
- Prompt user to input file
- Prompt user to calculation
- Open input file
- Open output file
- For each pixel
- Read existing pixel color
- Compute new pixel color
- Write new pixel color
Take note that the read/eval/print steps all take place within the loop (giving us our REPL). These steps also largely correlate to the functions we are writing. Implement and test your functions one at a time.
Due to the procedural style, your main.cpp should be nothing more than creating a few variables and
then calling the functions in the appropriate order. All of the specifics and details are abstracted away to ppm_functions.cpp.
When we're all done, be sure to close all files in use.
Be sure to be validating all the inputs from the user. Ensure they are both the correct type and the correct value.
Grading Rubric
Your submission will be graded according to the following rubric.
| Points | Requirement Description |
| 3 | All code submitted properly. |
| 25 | All labs completed and submitted. |
| +2 | L2B Extra Credit. |
| 4 | User enters image to open and processing to apply. |
| 4 | Program flow and error checking follow above requirements. |
| 5 | Functions created and used correctly. |
| 4 | Image read from file properly. |
| 4 | Image written to file properly. |
| 4 | Grayscale conversion calculated properly. |
| 4 | Color inversion calculated properly. |
| 2 | Public test images generate correct results. |
| 2 | Private test images generate correct results. |
| 2 | (1) Comments used. (2) Coding style followed. (3) Appropriate variable names, constants, and data types used. (4) Instructions followed. |
| 63 | Total Points |
→This assignment is due by Friday, February 18, 2022, 11:59 PM.←
→ As with all assignments, this must be an individual effort and cannot be pair programmed. Any debugging assistance must follow the course collaboration policy and be cited in the comment header block for the assignment.←
→ Do not forget to complete the following labs with this set: L2A,
L2B,
L2C,
L2D,
L2E
←
Submission
Always, always, ALWAYS update the header comments at the top of your main.cpp file. And if you ever get stuck, remember that there is LOTS of help available.
It is critical that you follow these steps when submitting homework.
If you do not follow these instructions, your assignment will receive a major deduction. Why all the fuss? Because we have several hundred of these assignments to grade, and we use computer tools to automate as much of the process as possible. If you deviate from these instructions, our grading tools will not work.
Submission Instructions
Here are step-by-step instructions for submitting your homework properly:
-
Make sure you have the appropriate comment header block at the top of every source code file for this set. The header
block should include the following information at a minimum.
Be sure to fill in the appropriate information, including:/* CSCI 261: Assignment 2: A2 - PPM Image Editor
* * Author: XXXX (INSERT_NAME) * Resources used (Office Hours, Tutoring, Other Students, etc & in what capacity): * // list here any outside assistance you used/received while following the * // CS@Mines Collaboration Policy and the Mines Academic Code of Honor * * XXXXXXXX (MORE_COMPLETE_DESCRIPTION_HERE) */- Assignment number
- Assignment title
- Your name
- If you received any type of assistance (office hours - whose, tutoring - when), then list where/what/who gave you the assistance and describe the assistance received
- A description of the assignment task and what the code in this file accomplishes.
Additionally, update theMakefilefor A2 to generate a target executable namedA2.
- File and folder names are extremely important in this process.
Please double-check carefully, to ensure things are named correctly.
- The top-level folder of your project must be named
Set2 - Inside
Set2, create 6 sub-folders that are required for this Set. The name of each sub-folder is defined in that Set (e.g.L2A,L2B,L2C,L2D,L2E, andA2). - Copy your files into the subdirectories of
Set2(steps 2-3), zip thisSet2folder (steps 4-5), and then submit the zipped file (steps 6-11) to Canvas. - For example, when you zip/submit
Set2, there will be 6 sub-folders calledL2A,L2B,L2C,L2D,L2E, andA2inside theSet2folder, and each of these sub-folders will have the associated files.
- The top-level folder of your project must be named
- Using Windows Explorer (not to be confused with Internet Explorer), find the files
named
main.cpp, Makefile, ppm_functions.h, ppm_functions.cpp.
STOP: Are you really sure you are viewing the correct assignment's folder? - Now, for A2, right click on
main.cpp, Makefile, ppm_functions.h, ppm_functions.cppto copy the files. Then, return to theSet2/A2folder and right click to paste the files. In other words, put a copy of your homework'smain.cpp, Makefile, ppm_functions.h, ppm_functions.cppsource code into theSet2/A2folder.
Follow the same steps for each lab to put a copy of each lab's deliverable into theSet2/L2folders. Do this process forSet2/L2A(main.cpp, Makefile),Set2/L2B(main.cpp, Makefile),Set2/L2C(main.cpp, Makefile),Set2/L2D(main.cpp, Makefile, README.txt),Set2/L2E(calculator_functions.h, calculator_functions.cpp, main.cpp, Makefile, README.txt).
STOP: Are you sure yourSet2folder now has all your code to submit?
- Now, right-click on the
"Set2"folder.- In the pop-up menu that opens, move the mouse
"Send to..."and expand the sub-menu. - In the sub-menu that opens, select
"Compressed (zipped) folder".
STOP: Are you really sure you are zipping aSet2folder with sub-folders that each contain amain.cppfile in it?
- In the pop-up menu that opens, move the mouse
- After the previous step, you should now see a
"Set2.zip"file.
- Now visit the Canvas page for this course
and click the
"Assignments"button in the sidebar.
- Find Set2, click on it, find the
"Submit Assignment"area, and then click the"Choose File"button.
- Find the
"Set2.zip"file created earlier and click the"Open"button.
STOP: Are you really sure you are selecting the right homework assignment? Are you double-sure?
- WAIT! There's one more super-important step. Click on the blue
"Submit Assignment"button to submit your homework.
- No, really, make sure you click the
"Submit Assignment"button to actually submit your homework. Clicking the"Choose File"button in the previous step kind of makes it feel like you're done, but you must click the Submit button as well! And you must allow the file time to upload before you turn off your computer!
- Canvas should say "Submitted!". Click "Submission Details" and you can download the zip file you just submitted. In other words, verify you submitted what you think you submitted!
In summary, you must zip the "Set2" folder
and only the "Set2" folder, this zip folder must have several sub-folders, you must name all these folders correctly, you must submit the correct zip file for this
homework, and you must click the "Submit Assignment" button. Not doing these steps is like bringing your
homework to class but forgetting to hand it in. No concessions will be made for
incorrectly submitted work. If you incorrectly submit your homework, we will not be able to
give you full credit. And that makes us unhappy.
→This assignment is due by Friday, February 18, 2022, 11:59 PM.←
→ As with all assignments, this must be an individual effort and cannot be pair programmed. Any debugging assistance must follow the course collaboration policy and be cited in the comment header block for the assignment.←
→ Do not forget to complete the following labs with this set: L2A,
L2B,
L2C,
L2D,
L2E
←