Welcome to your assignment for our last week of CSCI 102! This assignment
has three parts:
Part A: to be done before Studio Day (i.e., before your class on Thursday, April 16th),
Part B: to be done during Studio Day on Thursday, April 16th, and
Part C: to be done after Studio Day (due Tuesday, April 21st, 11:45pm).
Details on
all three of these TODO items are on this page. The total number of
points for this Git assignment is 20 points (all toward the Weekly Labs category); see below for the
break down among the three assignments.
Part A: Pre-Studio Class Work (2 points)
TODO before your Studio class on Thursday, April, 16th
Assignment: Installing GitHub Desktop
You will learn git, a handy open source tool for managing projects, in this assignment.
There are many applications that
add a gui (graphical user interface) on top of git (such
as gitkraken, fork, and TortoiseGit). Because
git is very visual, using a front-end will make it easier for us
to understand what is going on. For this assignment, we are
going to use Github Desktop.
If you do not have one already, create an account on GitHub by going to
github.com and clicking on “Sign up” in the upper
right hand corner. I suggest using your personal email. Then you can keep using
git for your projects after you leave Mines.
After opening GitHub Desktop, sign into your GitHub account.
You can configure the appearance of your GitHub Desktop. For now, we suggest keeping the
defaults.
Submission of Part A: Submit a screenshot of your GitHub Desktop application running
on your computer. This is due before your Studio Day class period.
Part B: During Studio (5 points)
TODO during your Studio class on Thursday, April, 16th
FOR PEOPLE WHO ALREADY KNOW GIT
If you already have experience using the git command line (and don’t want
to learn a new client), you can follow along with this lab and submit a
git log > gitlog.txt instead of a screenshot. If that means nothing to
you, use GitHub Desktop!
Creating your First Repo
Now that you have the GitHub Desktop application installed, create
your first repository!
Note: the following steps will create a repository local to
your computer. Even though this tool is called “GitHub Desktop”, your code is
not on GitHub. Putting your code on GitHub is another step down the line.
Open GitHub Desktop from wherever you downloaded / installed it
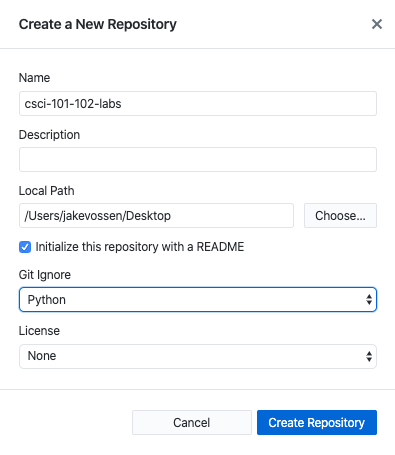
File -> New Repository…
We are going to be adding your old 101 / 102
labs, so we suggest you name your repository something like csci-101-102-labs. (Or just use
csci-102-labs, if you are not in CSCI 101.)
Change the Local Path to something you can easily find (e.g., your Desktop)
Check the box next to ‘Initialize this project with a README’
Select Python under the ‘Git Ignore’. FYI: we will not talk about
git ignore in this lab. If you become a regular user of git,
we encourage you to learn about it!
Once the above steps look something like this figure, click “Create Repository”!
Creating Files in your Repo
You should have a new folder named csci-101-102-labs in wherever you
created the repository. Inside that folder should be a file called READEME.md. This is
just like any folder on our computer, where you can can add any file to it. We want to
deal with code in our git repository, so let's create a
simple Python program to add to our git repo.
Open IDLE and create a new Python program
Add the contents print("Hello world, but in git!") to the file
Save the file in the repository folder, naming it
hello.py
Verify that you have two files (hello.py, README.md)
inside the folder titled csci-101-102-labs
As you can see, this folder is just like other folders on your computer, EXCEPT
git is keeping track of some things for you behind the scenes.
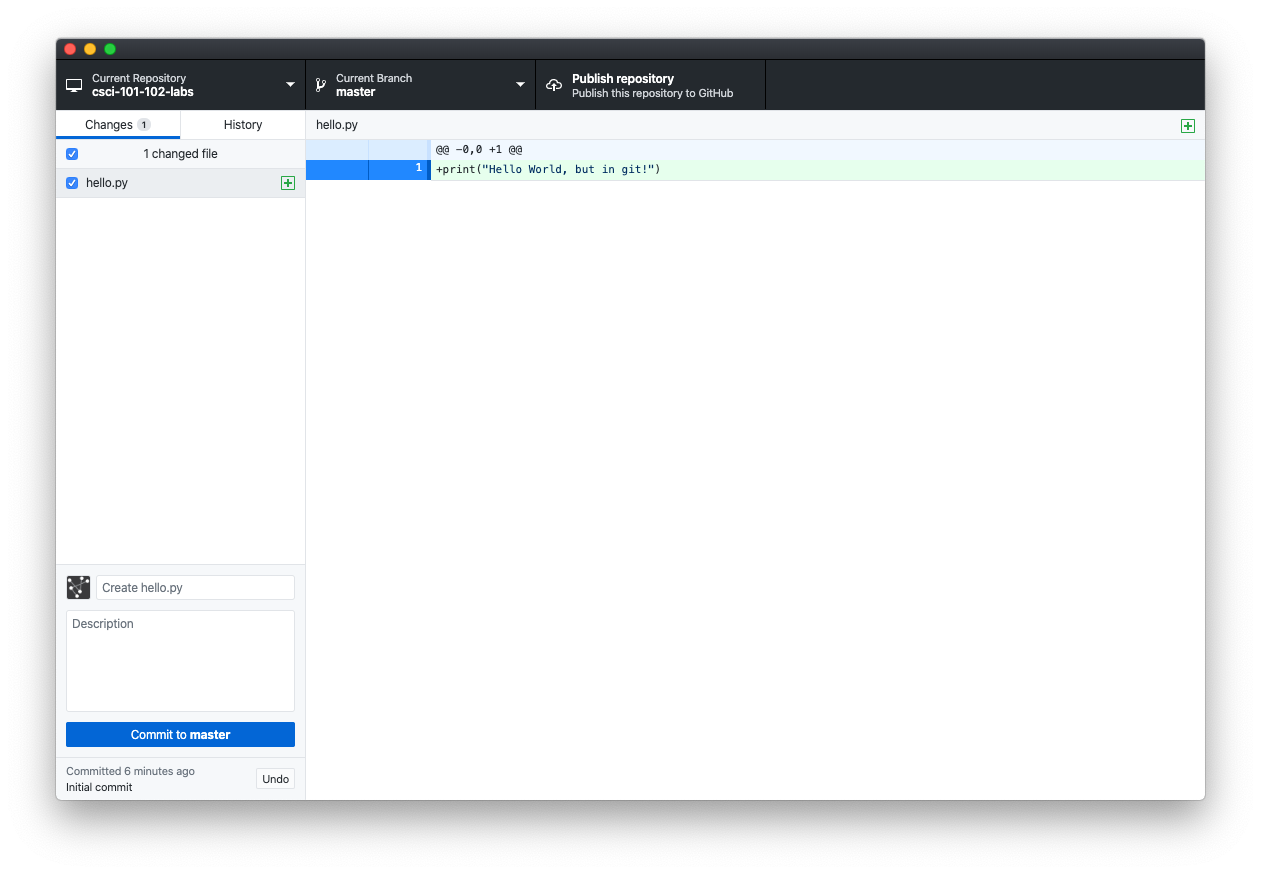
Seeing our changes in GitHub Desktop
Navigate back to the GitHub Desktop application, your screen should look something
like this:
There are a number of different views we can see here
The ‘main’ view on the right shows the difference between your changes and
the last commit
The files you have changed are shown on the left. The checkbox next to the file is checked, which means the
file is staged and will be a part of your next commit. Selecting
a file will bring it into the main view, where you can see the changes made
to that file
The bottom left is where you add a message and optional description to your
commit
We can now go ahead and ‘commit’ our change. This means that git will
remember what the files look like in our repository at this snapshot in time.
Put a commit message in the box that currently says “Create hello.py”. This
message should be something that is useful for future programmers who see this
file. You can put any text here, e.g., something like “created a
hello world file”.
Then, go ahead and hit the “Commit to master”.
You should now see “no local changes” in your GitHub Desktop.
Making changes
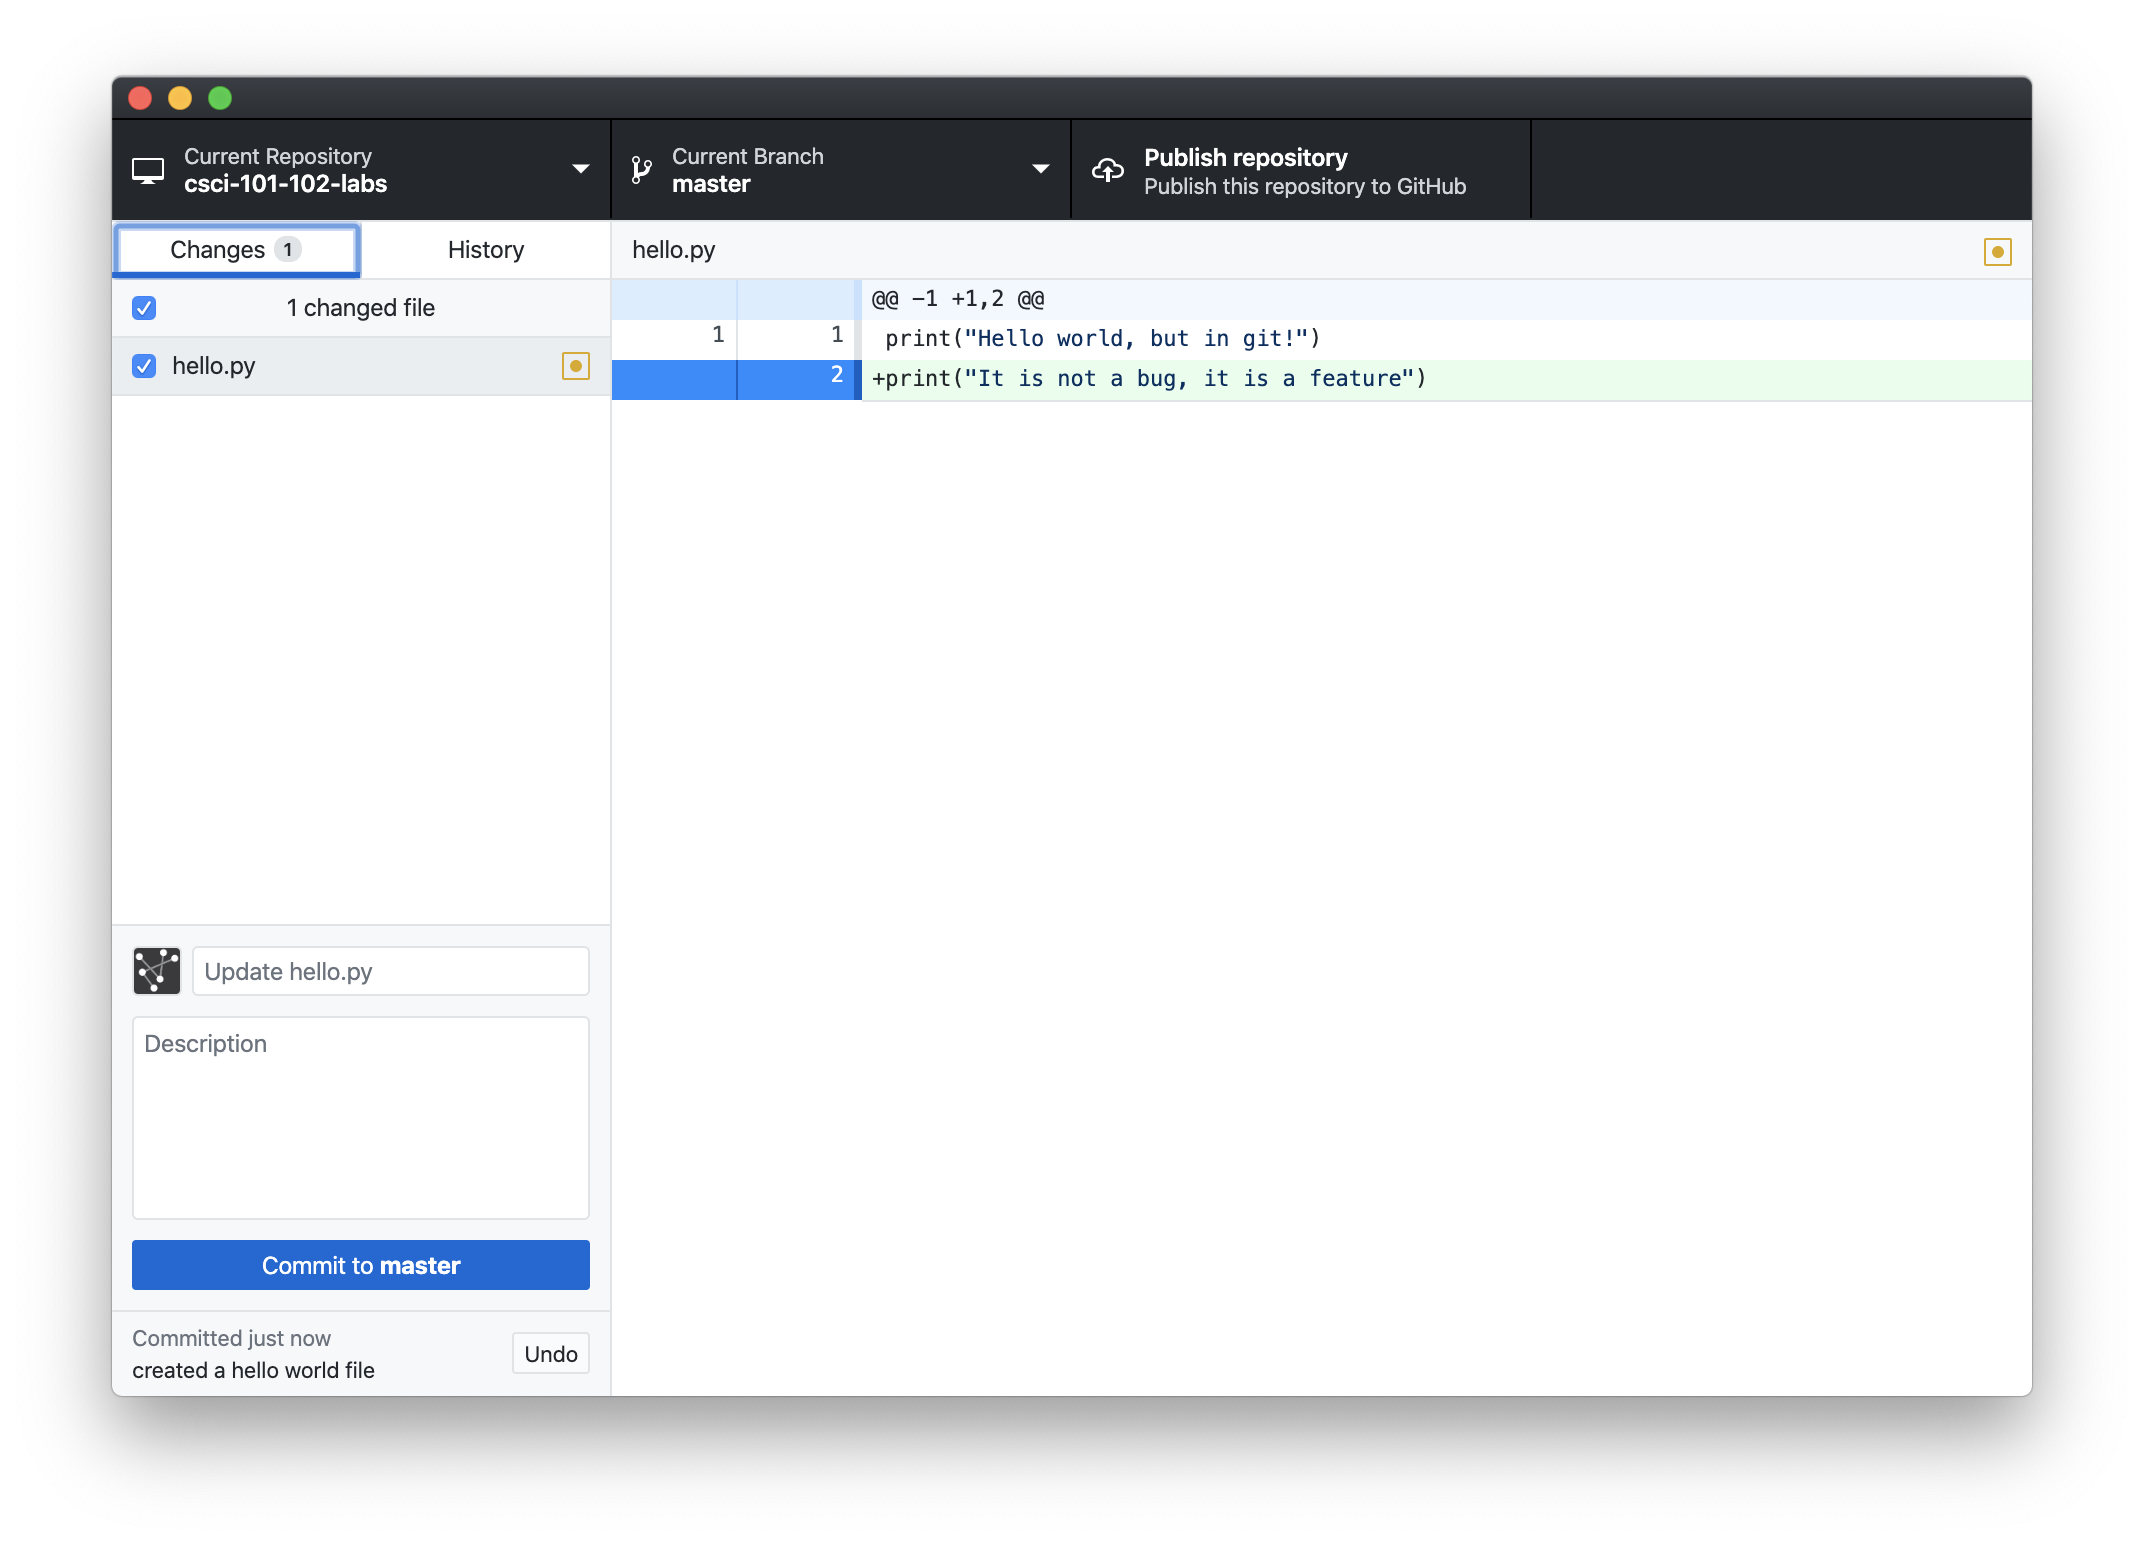
Go back to your hello.py file and add a second line that prints ‘It is
not a bug, it is a feature’. Your hello.py should look now like this:
print("Hello world, but in git!")print("It is not a bug, it is a feature")
Back on GitHub Desktop, your screen should look like this
Here we can see what is called a diff view, which compares the changes
we have made since our last commit. Go ahead and give this update to your Python program a descriptive commit
message, and commit to master.
Reverting Changes
Suppose you made a change to your code that is destroying the
production database. Luckily, because we are using git, we can easily
revert to any version of our software, i.e., we can revert back to a known working state.
To revert our hello.py program, first
close hello.py from IDLE
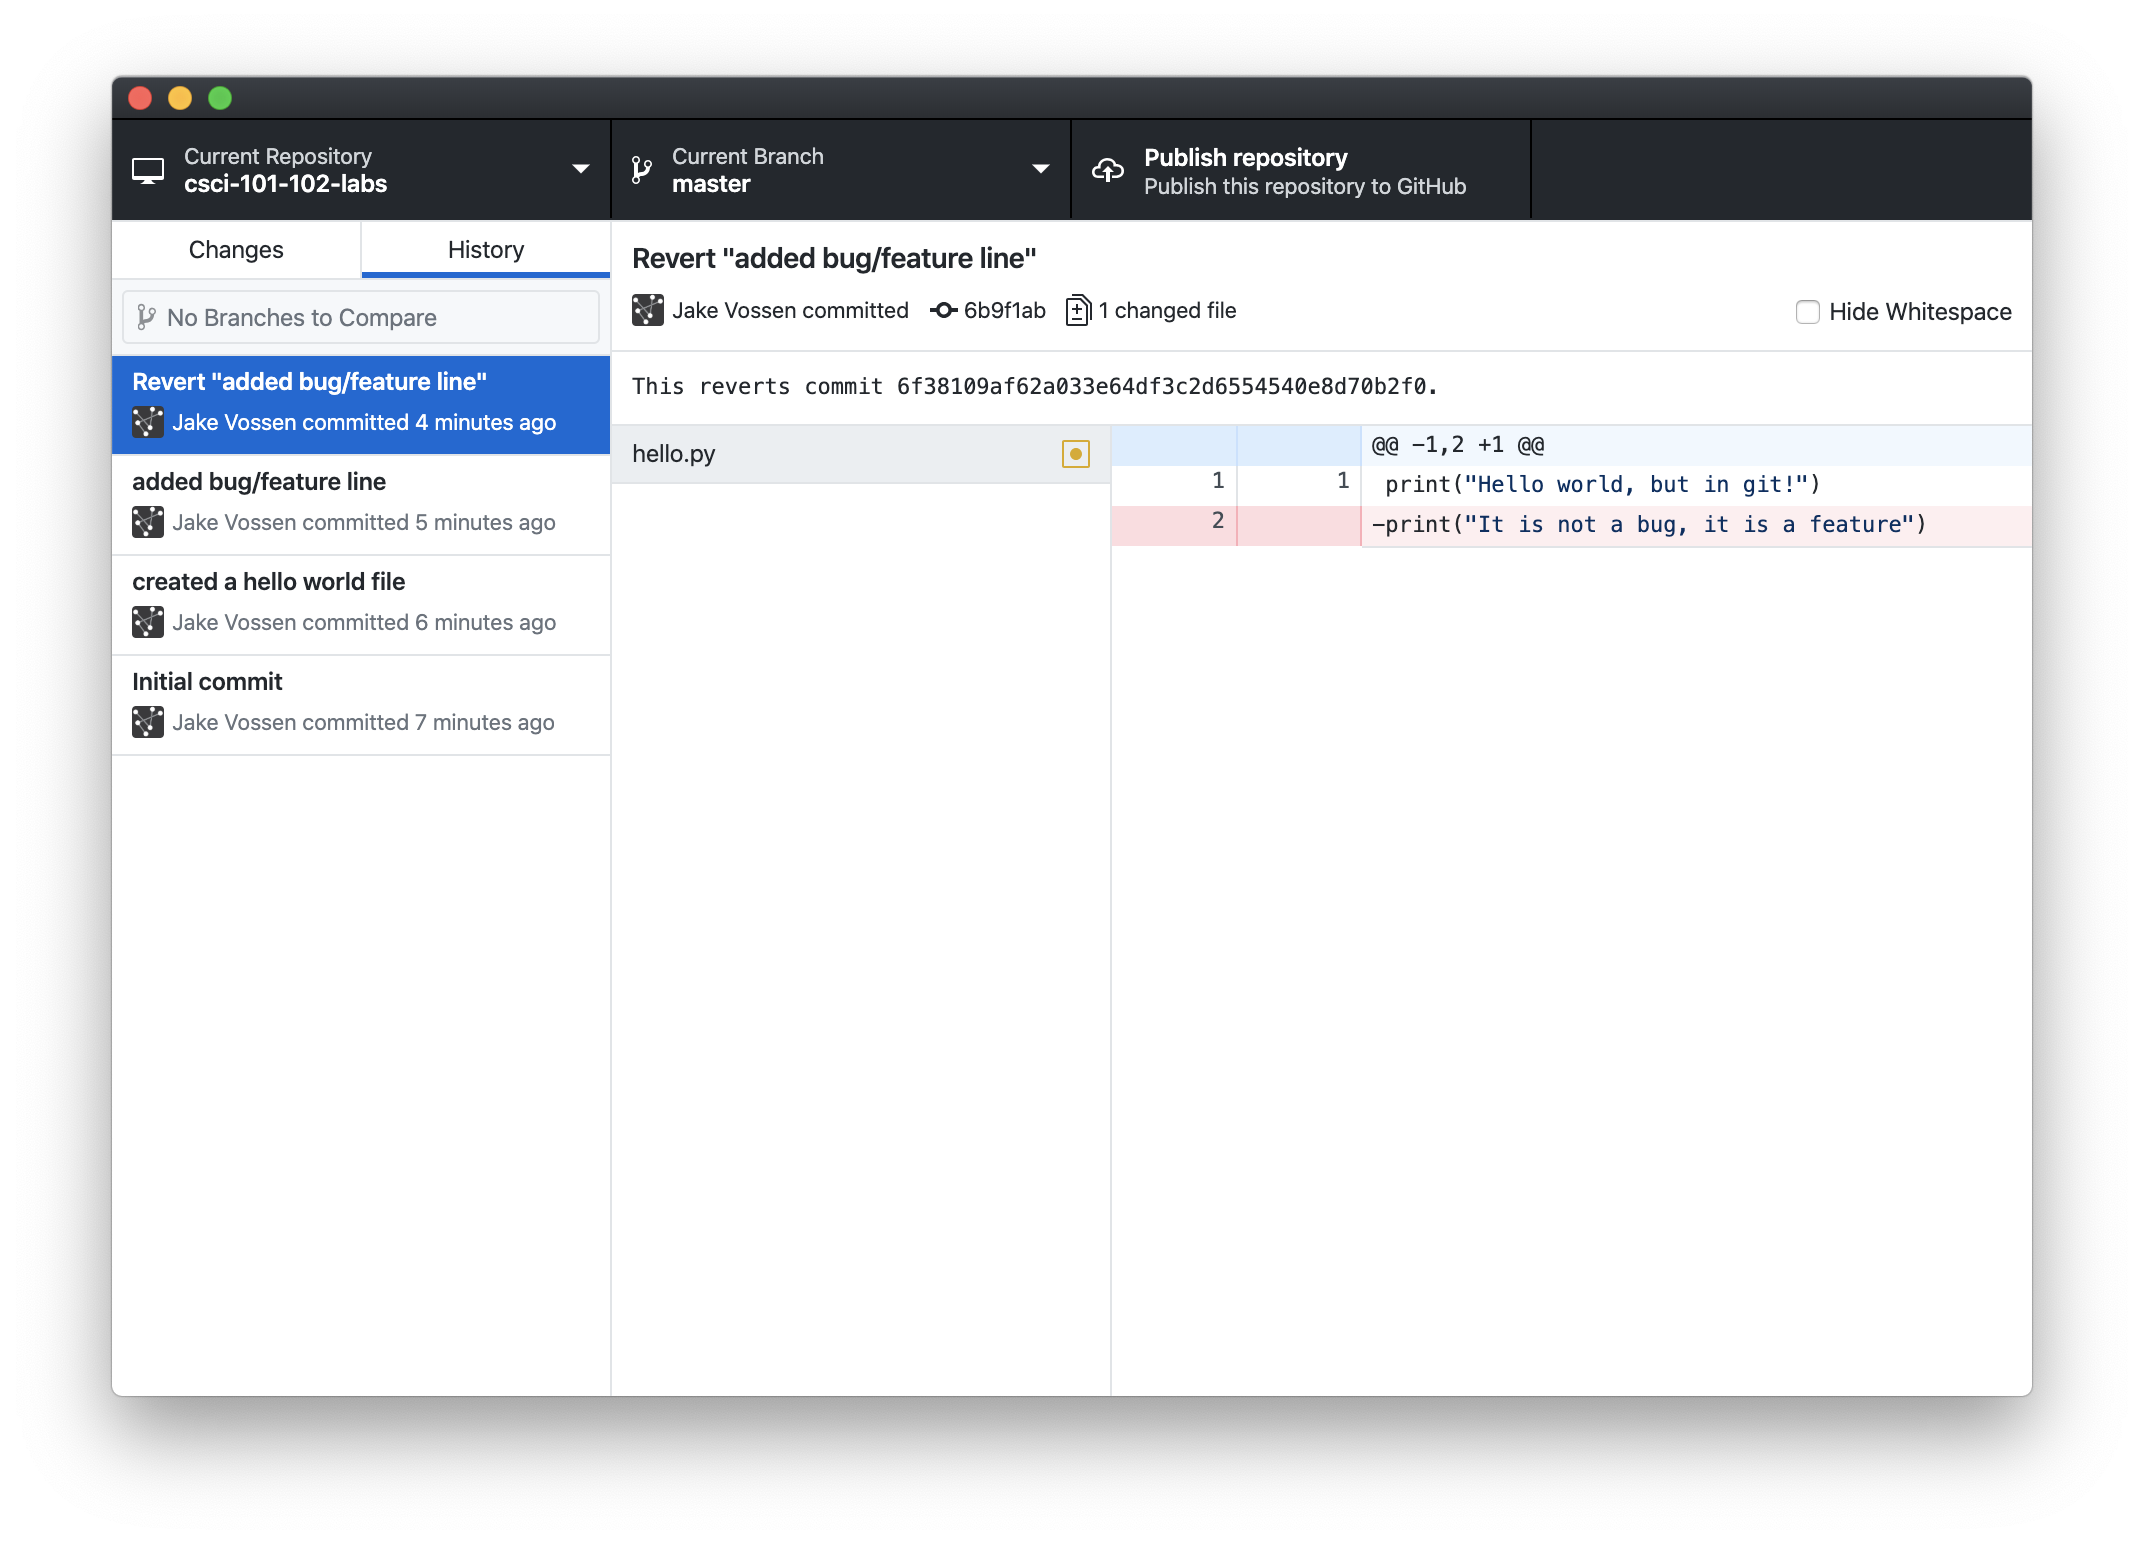
Go to the “History” tab on the left hand side of GitHub Desktop
Right click on the most recent commit, it should be the one that added the
print("it is not a bug, it is a feature")
Click on “Revert this Commit”
You should see a new commit added to the history that says “Revert (your commit
message here)”. In order to revert a commit, git creates a new commit
that is the ‘opposite’ of the commit you previously did (the one you are reverting).
Now, open hello.py again in IDLE and see that this file is
back to just print("Hello world, but in git!").
Submission of Part B:
Submit to Canvas a screenshot of your history page (e.g., see figure above).
If you used git from the command line, you can run
git log > gitlog.txt and submit the resulting text file. You should
submit this screenshot before your Studio Class ends.
Part C: Post Studio Work (13 points)
Due Tuesday, April 21st, 11:45pm
Now that we have a git repository local to our computer, the next step is to make
it available via GitHub. Fortunately GitHub Desktop makes this process pretty easy!
Open GitHub Desktop (if you don’t have it open already). If the repository we
created in Part B is not listed at the very top left of your GitHub Desktop window,
click on the area and select the name of the repo you created in Part B.
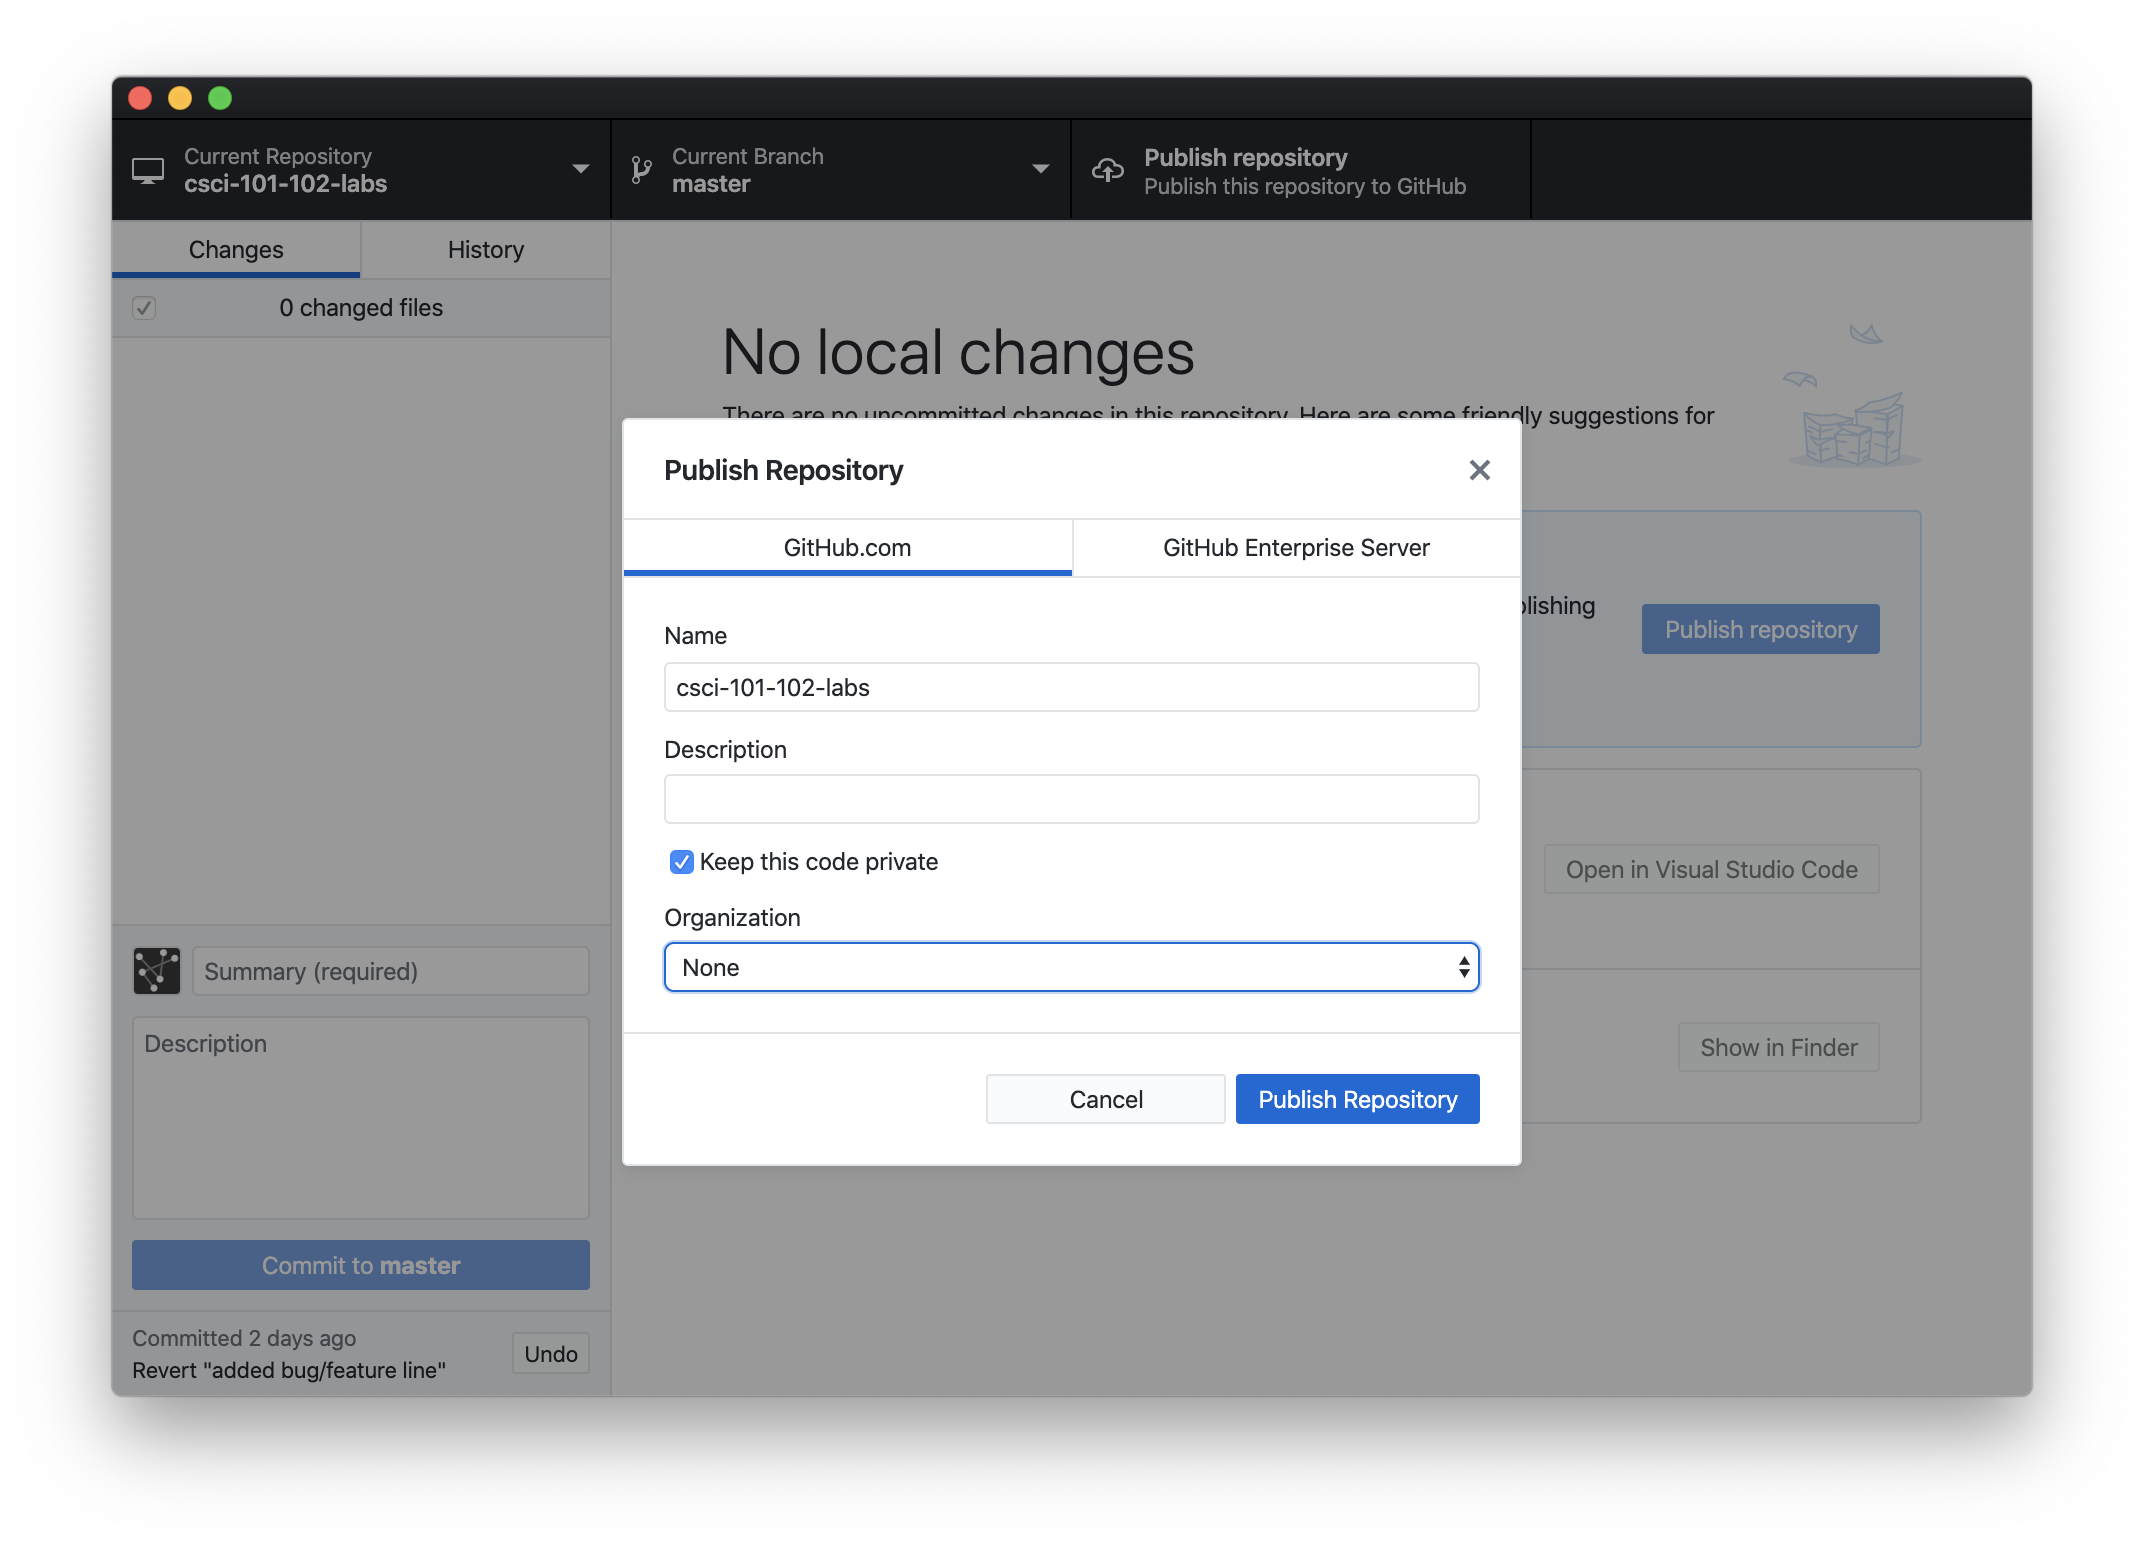
On this top menu bar, click on the option that says “Publish this Repository”.
You can use the default settings if you want. One KEY POINT: it is very
important that your code is private (because you will
be uploading your 101 and 102 labs to your repo). You are responsible for keeping your
files safe.
Once the above steps are down (especially the PRIVATE setting), click on “Publish Repository”.
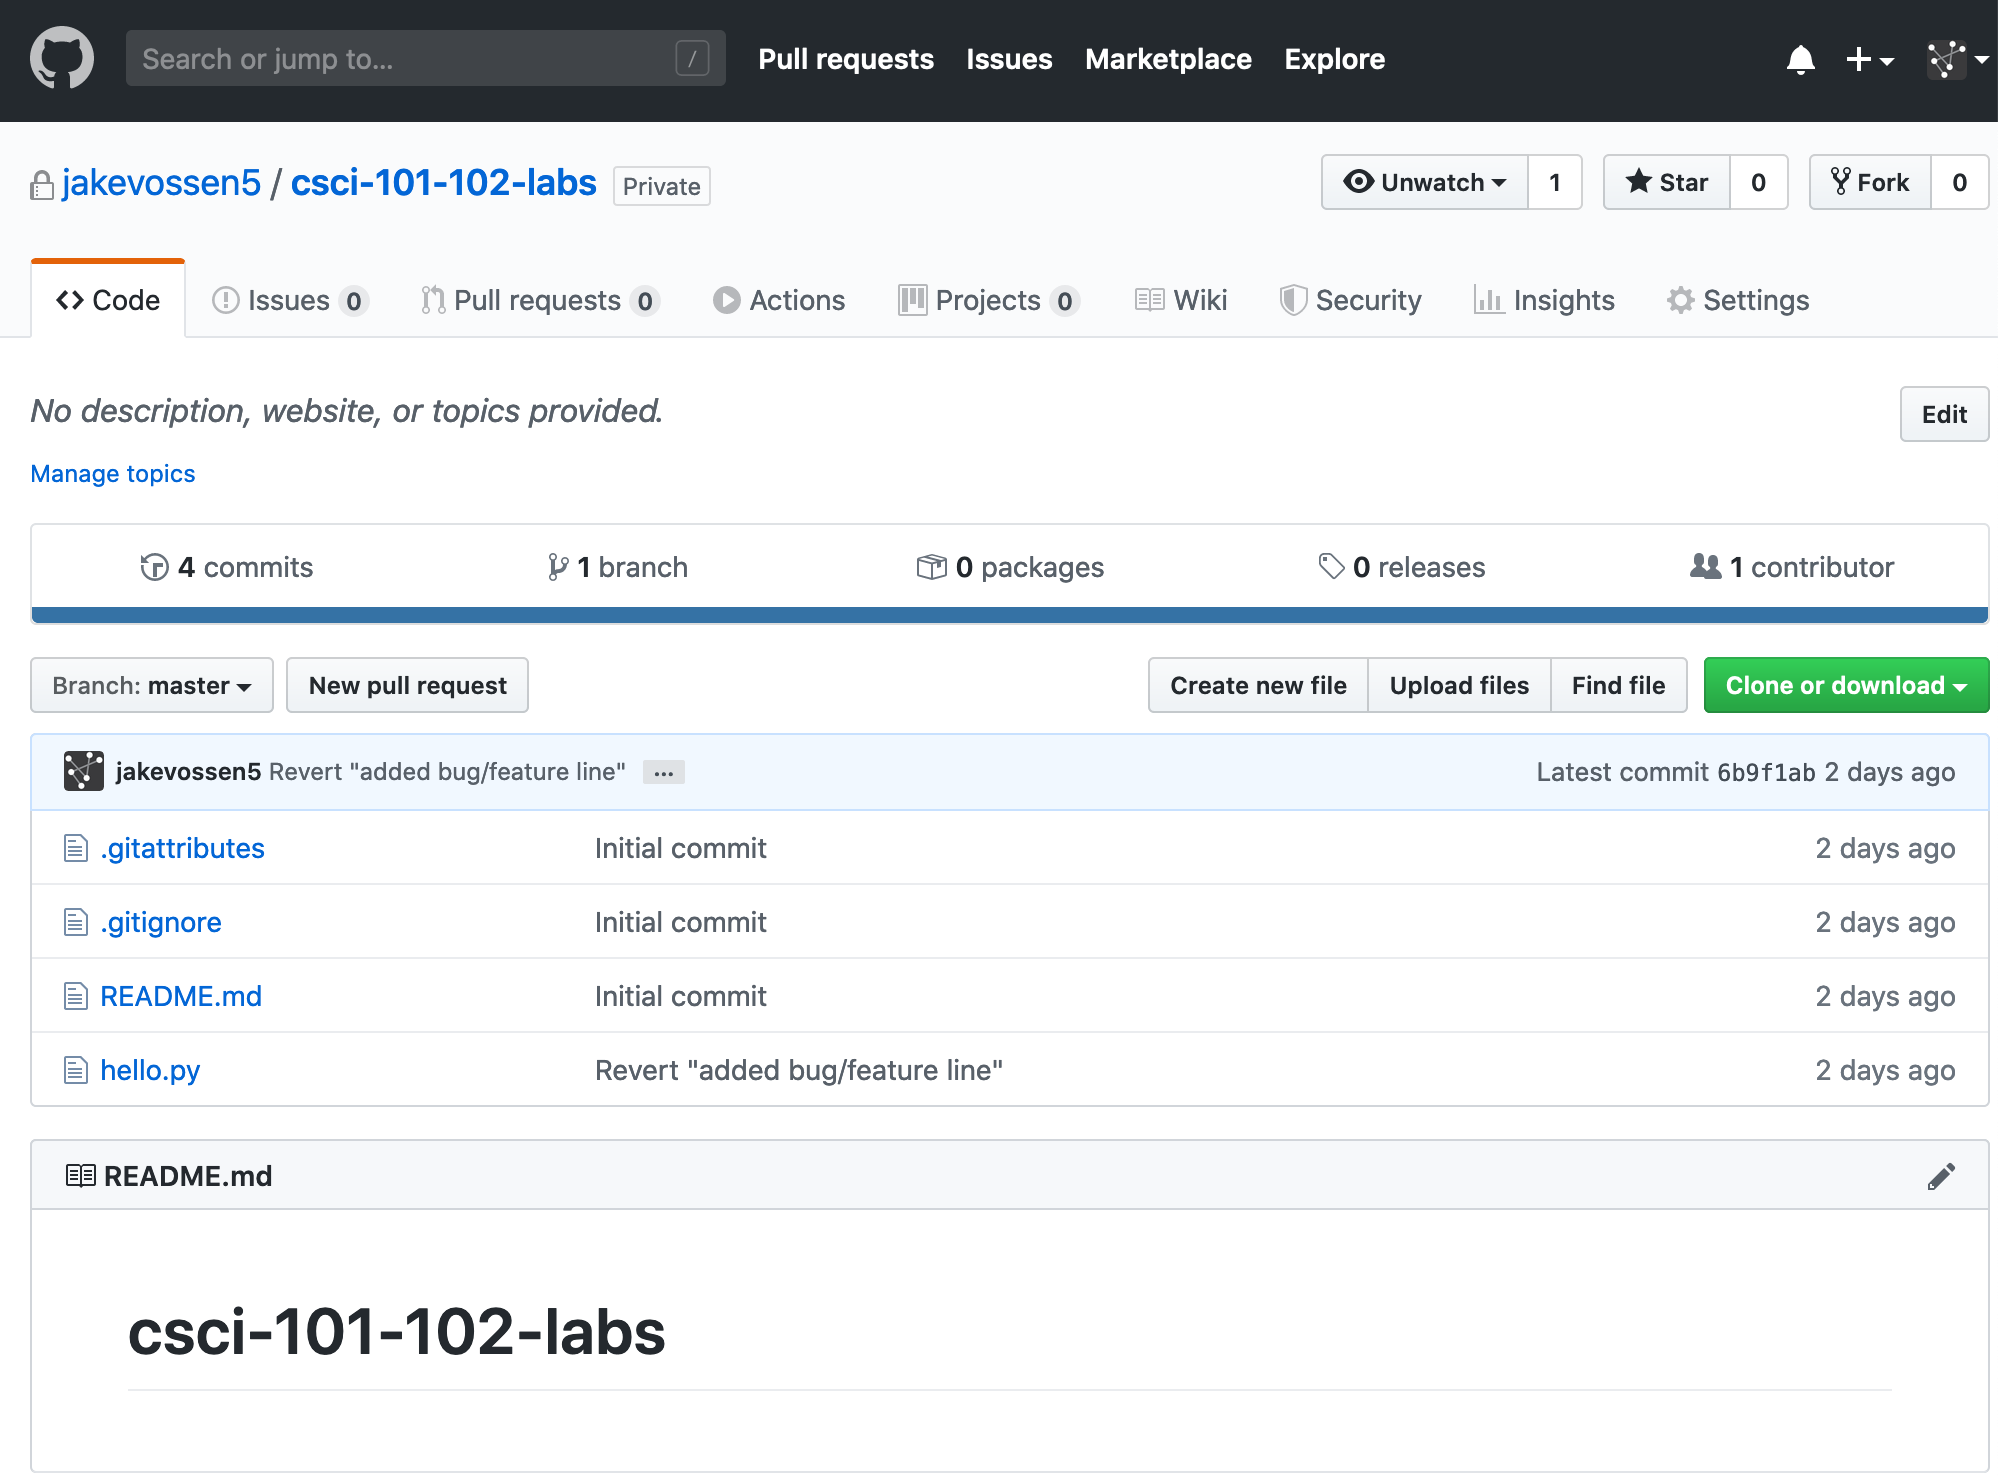
You can now view your code on the GitHub website. You can do this by
navigating to
https://github.com/<yourusername>/csci-101-102-labs. At this point,
your code on GitHub should look identical to the code you have in your local repository. If
you get a “page not found error”, sign into GitHub and
try again. It should look something like this.
Adding our Python Code
Since we want a large number of files to work with, we will add all our
previously developed 101 and 102 labs to this local repository.
From your Finder / File explorer, create 1-2 new folders (two if you are in both 101 and 102):
a 101 and a 102 folder.
Copy your 101 labs to the 101 folder, and your 102 labs to
your 102 folder.
Open GitHub Desktop.
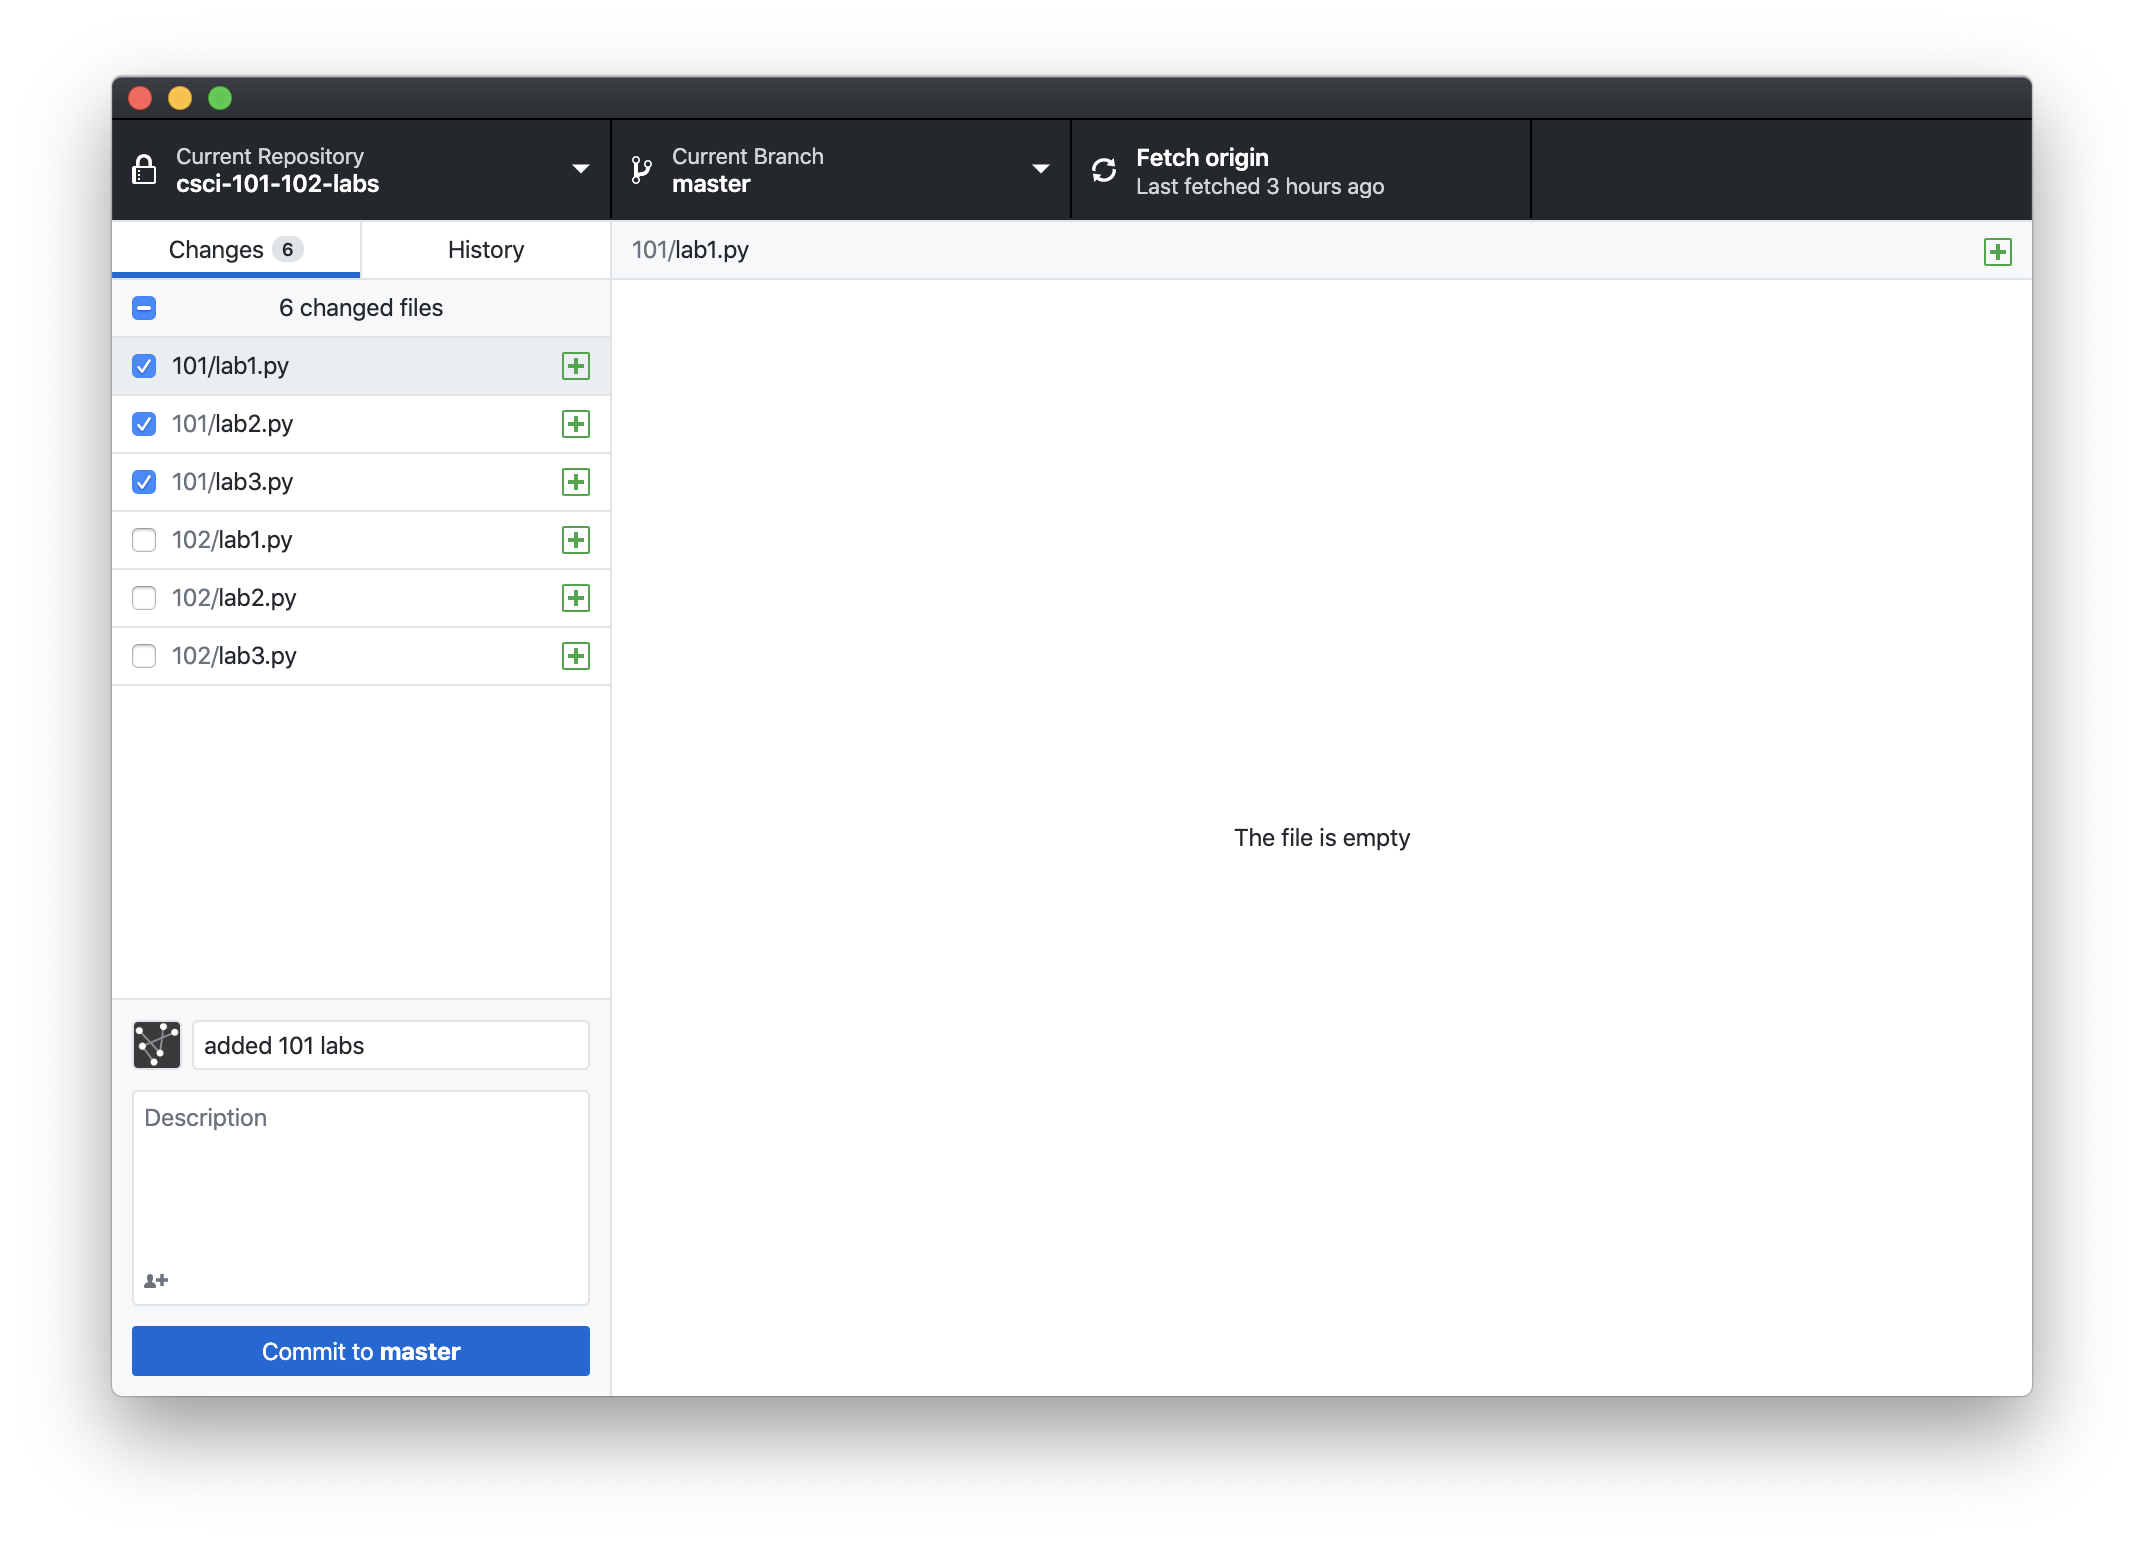
Select only your 101 labs (or half of your 102 labs, if you
are not in 101) on the left hand side. (Recall: what is selected is what is staged for commit.)
In the commit summary area, write something like ‘added 101 labs’.
Verify that your GitHub Desktop looks something similar to the following (which
doesn't have all of the 101 and 102 labs, i.e., your number of files / names of your
files will be different).
Let's stop a minute and think about what we are doing before we hit ‘commit to master’.
As discussed earlier, committing creates a snapshot of what our files look
like at this current time. Thus, the content of the files that we have
staged right now will be saved by gitforever. Press ‘commit to master’.
Syncing with GitHub
Sign back into GitHub and go to your csci-101-102-labs repository.
Are the files there what you expected? Maybe not. The files on GitHub did not
change since the last time you looked at GitHub, as the commit
we made only makes changes to our local repository.
How do we make our new code added to GitHub Desktop available on GitHub? We do this
through a process called pushing. You can push
to GitHub from GitHub Desktop by pressing the “Push origin” on the top bar.
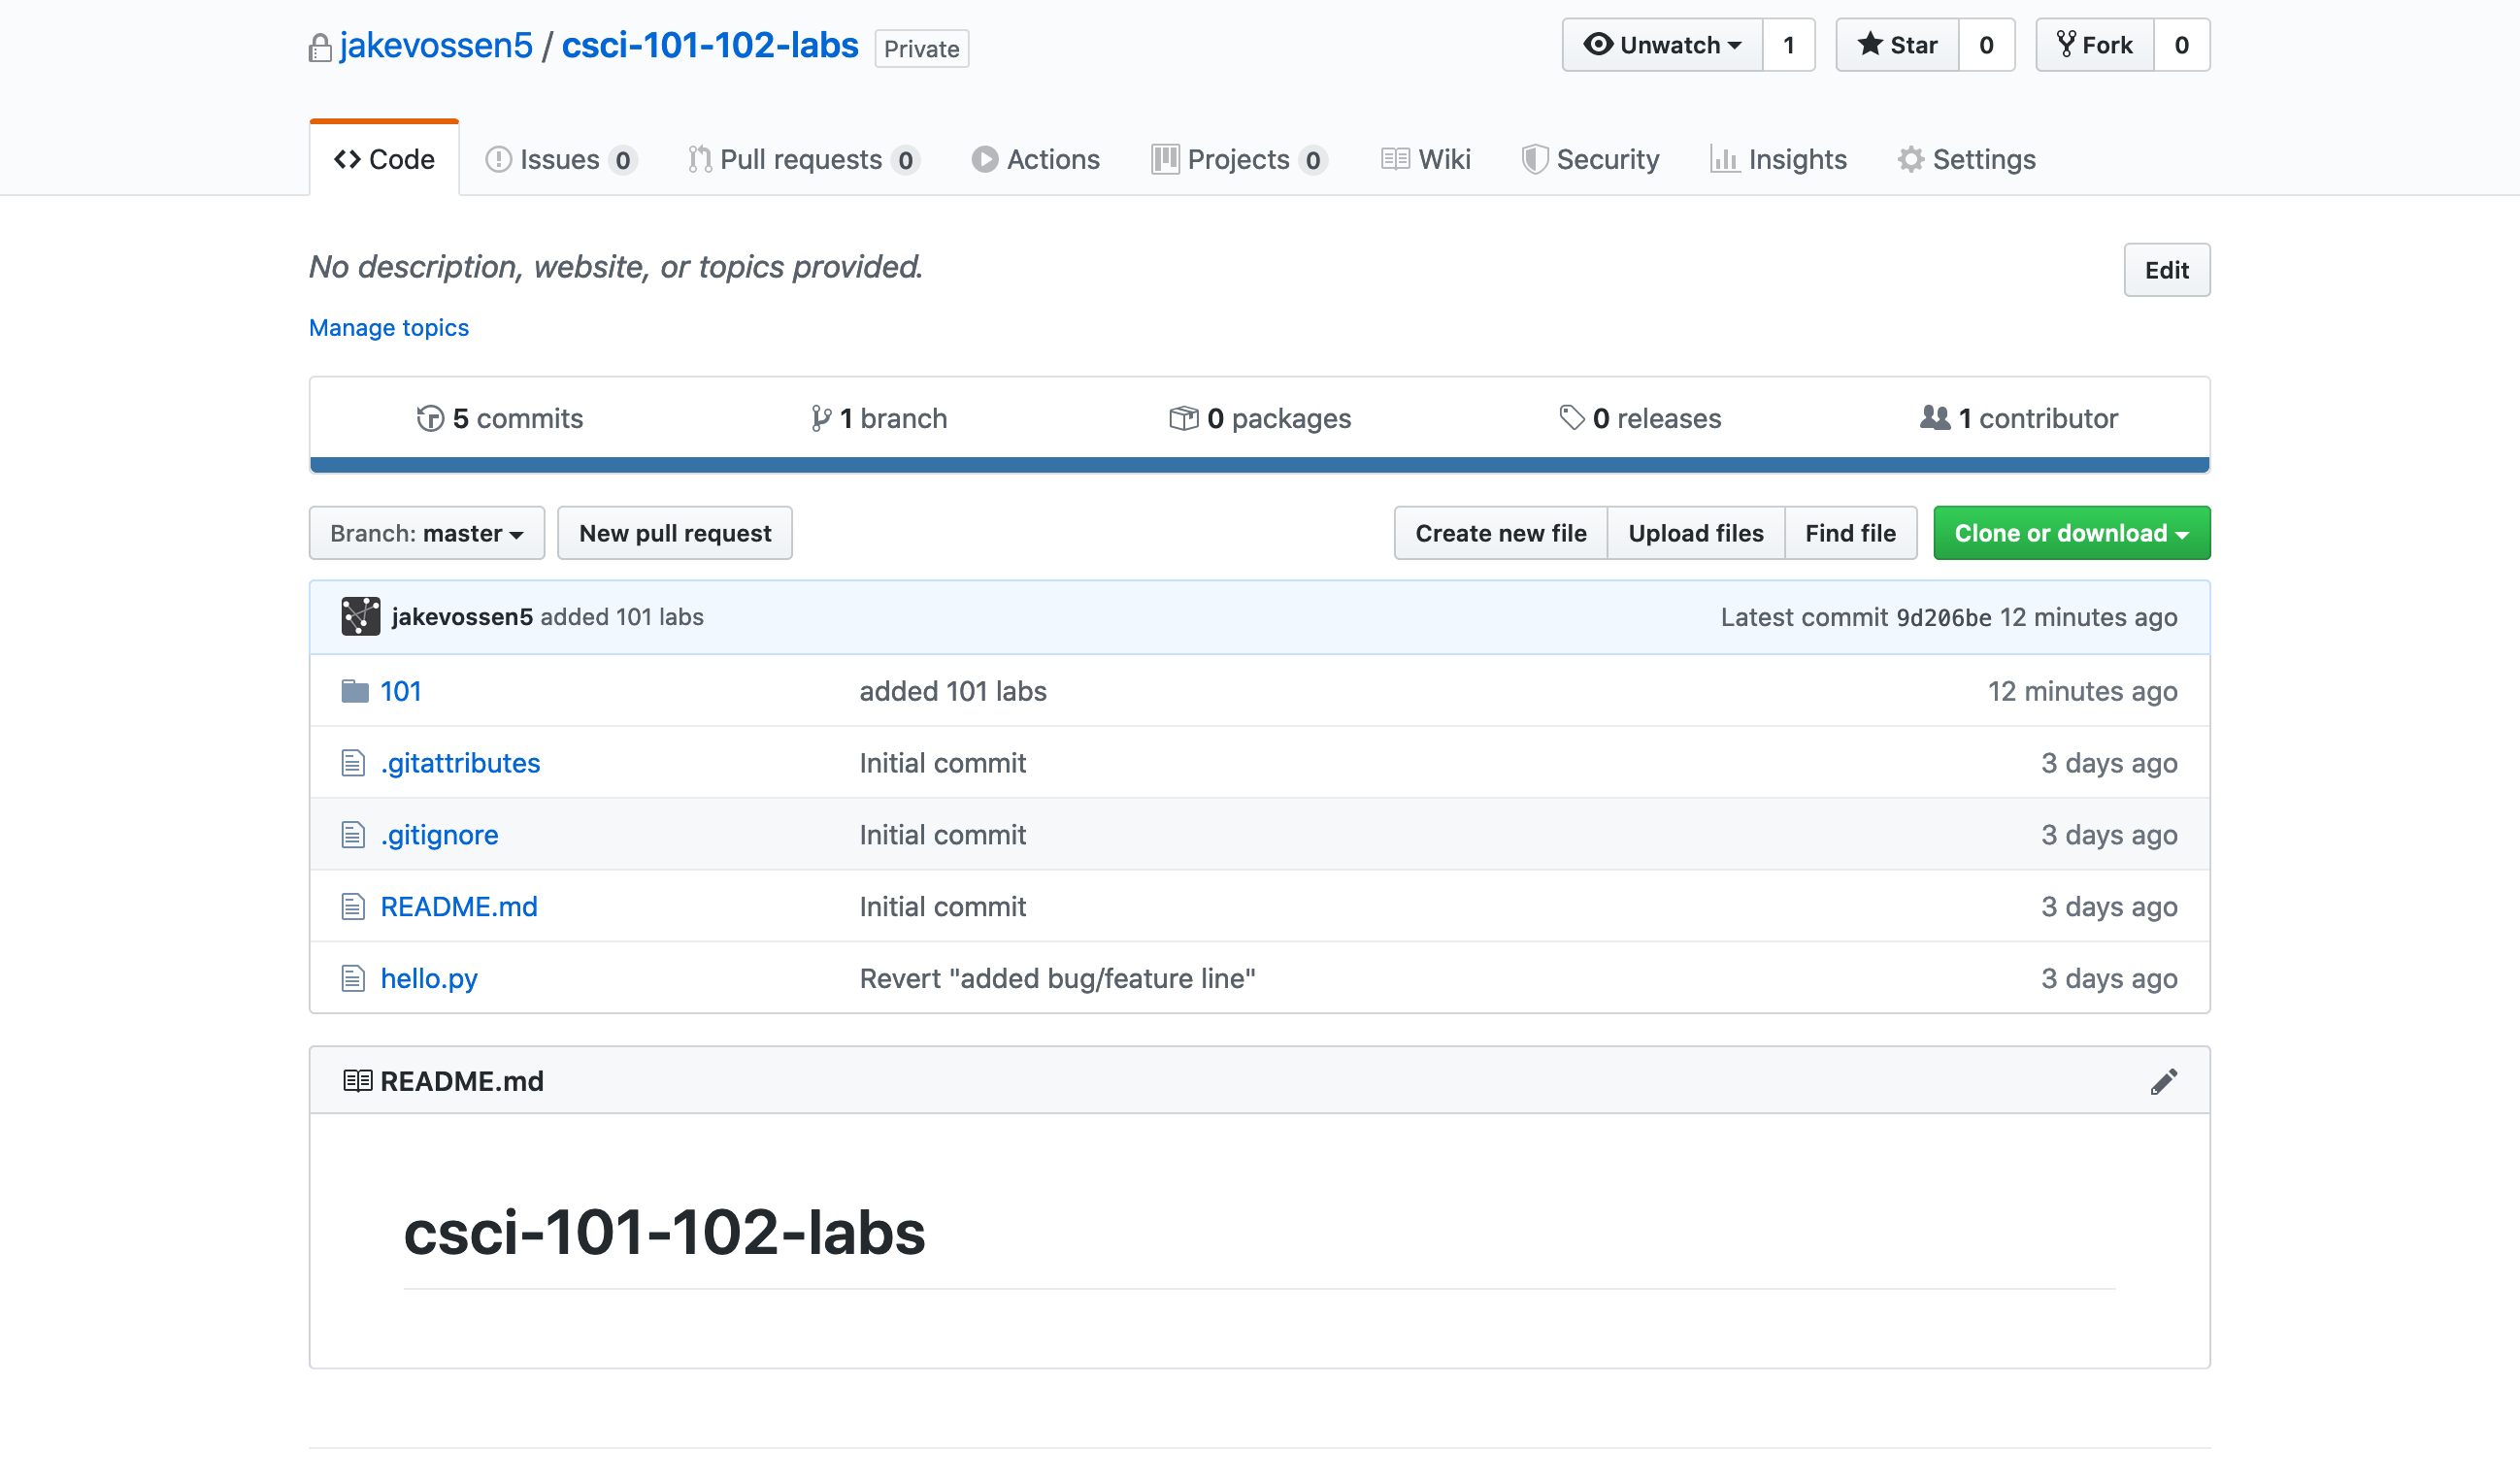
Now, after you refresh github.com/<yourusername>/csci-101-102-labs, you
should see something like this.
Take a few minutes and think about what this all means. Our 101 folder
is here, but our 102 folder is not. (Or if you are only in 102,
only half of your files are there.) This is because we only
commited the 101 folder changes.
Trying it on your own
On your own, add all your 102 labs, commit, and push.
Verify that what you see at
github.com/<yourusername>/csci-101-102-labs is the same
as what you see on GitHub Desktop, i.e., you should have no uncommitted changes on
the left.
Coding with Git
In this lab, you will use GitHub as you develop a Python program. As you know,
when developing any
large coding project, it is valuable to develop the program incrementally, where you
design, then code, then test,
then design, then code,
then test, etc. This software development model is referred to as the
incremental build
model.
In this lab, where you follow the incremental build software development model, you
are to
commit your Python program in git SEVERAL times during its development.
Specifically, you should develop each function incrementally; once a new function is
fully developed (after you've tested it), you should push it to your repository.
Then, at the end of this lab, you should have nine (or more) commits. The first
commit will be when you add your Week13-utility.py file. The next
eight
commits will be after you have fully developed each of the eight functions below.
(It is
OK if you end up with more than nine commits.)
For your Week13-utility.py file, define the following utility functions
(and, again, after each
function is developed, push it to your repository):
print_output: copy this function from your
Week 11
lab.
Here's an example of using this function:
>>> print_output("Hello World")
OUTPUT Hello World
load_file is a function that takes in a string (a filename) and then
returns a list. The
list is the contents of the file, where each element is a list of data from
the file.
Here's an example of using this function. The input file had four lines of
text.
>>> lines = load_file("test.txt")
>>> print("OUTPUT", lines)
OUTPUT ["Hello there", "I am a test file", "please load me in and print
me out", "Thanks"]
update_string is a function that takes in two strings and an index
integer (no return).
The function should print a string that is the first string modified to
replace the
character at the index provided with the second string.
(Remember that strings are immutable, i.e., some_string[5] = 'a'
will give you an error.)
Here's an example of using this function:
>>> update_string("Hello World", "a", 3)
OUTPUT Helao World
find_word_count is a function that takes in a
list and a string. The function then returns the number of occurances of the
string in the list.
Here's an example of using this function:
>>> a = load_file("alice.txt")
>>> print_output(str(find_word_count(a, "Alice")))
OUTPUT 403
score_finder is a function that takes in two lists and a string.
The first list is a list of strings (player names), the second list is a
list of floats (player scores),
and the string is a name (player to find). If the player to find exists in
the list of player names,
then print the name of that player along with their associated score (which
is in the second list at the
same index). If the player to find does not exist in the list of player
names, print player not found.
Here are two examples of using this function:
>>> players = ["Mary", "Cody", "Joe", "Jill", "Xai", "Bodo"]
>>> scores = [5, 8, 10, 6, 10, 4]
>>> score_finder(players, scores, "jill") % NOTE: upper and
lowercase should both work
OUTPUT Jill got a score of 6
>>> score_finder(players, scores, "Manuel")
OUTPUT player not found
union takes in two lists and returns a single list that is the union
of the two lists
(i.e., return all values of the lists A and B with no duplicates).
Here's an example of using this function:
>>> players2 = ["Melvin", "Martian", "Baka", "Xai", "Cody"]
>>> print("OUTPUT", union(scores, players2))
OUTPUT [5, 8, 10, 6, 4, "Melvin", "Martian", "Baka", "Xai", "Cody"]
intersect takes in two lists and returns a single list that is
the intersection of the two lists
(i.e., return all values of the lists A and B that are in both A and B).
Here's an example of using this function:
print("OUTPUT", intersect(players, players2))
>>> OUTPUT ["Cody", "Xai"]
not_in takes in two lists and returns a single list that is all
values in the first list that are NOT
in the second list. Here's an example of using this function:
>>> print("OUTPUT", not_in(players2, players))
OUTPUT ["Melvin", "Martian", "Baka"]
Comments
All Python files submitted to Canvas should include a header with your name, section, and assignment info.
Submissions without this header will lose 1 point. Here's an example:
# Jake Vossen
# CSCI 102 – Section C
# Week 13 - Incremental Development
Submission for Part C
You need to submit two items to Canvas: (1) submit a screenshot of your history
page to "Week 13 Git Log 2" and (2) submit your Week13-utility.py file to "Week 13 Code".
If you used the git from the command line, you can run
git log > gitlog.txt and submit the resulting text file instead of a
screenshot.
To receive full credit, your Week13-utility.py code must execute in Python 3, and you must submit a
single file (your Python code file). In addition, your
code must use the function names listed.
Whenever you submit something to Canvas, we strongly recommend you always double check what you
submitted actually got submitted correctly (e.g., did the file upload correctly? did you submit the
correct file? etc.) If your submission is incorrect, it's on you.